Text-to-Speech how does that work?

With the functionality Text-to-Speech you can convert text into an audio clip. This can be done in multiple languages. This functionality is built into the Portal, component TourEditor.

How?

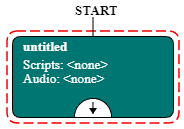
In the Tour, you open the stop by clicking on the stop’s title. The clips associated with this stop will be displayed. Each green frame is a clip. You open the clip by double clicking on the green frame.

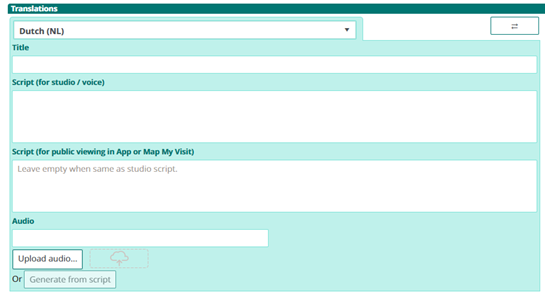
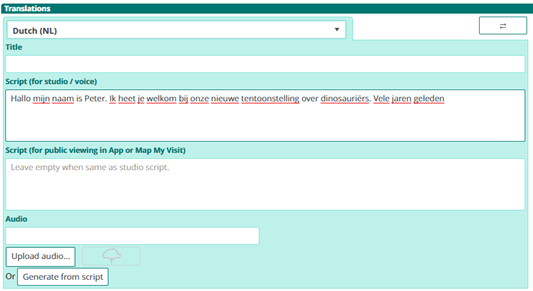
For each language you can enter a translated text in the field Script (for studio/voice).  Would you like to add a new language? please make sure to add the language to the Tour first.

When you have entered the text, the Generate from script button lights up

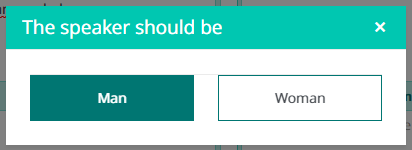
When you click on the button, an option will appear. In which you are asked whether you prefer a male or female voice.

It will take a few seconds, depending on the length of the script to generate the audio clip. The mp3 file appears in the Audio field.

To listen to the clip, click on the Play button. If you are happy with the result, click on the Save button in the top right corner of your screen.

How do I order custom labels for my Podcatchers and / or IDentifiers?

Guide-ID label orders, how does it work?

You will always receive our Podcatchers and IDentifiers with our standard Guide-ID labels. But If you would like to customize your labels you can! To do so, you can make use of our new design and ordering method.

Depending on the country you are located in, you will receive either an account or a link to a unique page where you can design and order your labels. Customers located in the Netherlands and Belgium will reveice an account from our Customer Support department. Customers located in other countries will be able to access their own unique page with a link they will receive from our Customer Support department.

Within this account / or on this page you can create, save, order and re-order your designs now and in the future. And you will also be able to order our standard Guide-ID labels and various StartIDentifiers labels you might need.

If you are already our customer and would like to order new or additional labels, you will also be able to use our new design and ordering method from now on! please contact our Customer Support at helpdesk@guide-id.com and we will make sure to set you up.

Would you like to re-order your current labels but cannot find them anymore?

Not to worry, let us know and we can email your current design so you can easily upload it into the design module to save and order again.

Always start designing and ordering in time so that you can receive the labels on time and start sticking! If you have any questions, we can always be reached by telephone of email.

Prevent missing Podcatchers

Introduction

There are several ways to minimize the risk of losing Podcatchers. In this specsheet you’ll find a number of tips and best practices.

Other ways

When a visitor uses a Podcatcher, you can expect them to return it after use. However, some visitors may neglect, or simply forget to do so. To lower the amount of Podcatchers ‘disappearing’ over time, there are several ways to activate a warning signal built into the Podcatcher to alert visitors they should return the device.

Warning IDentifier

The Podcatcher can sound its warning signal when it receives a Warning IDentifier code. This is a special IDentifier that is typically placed near the building exit so visitors should be notified at the right time.


Warning signal after idle time

The Podcatcher can also sound an warning signal when it is engaged in a Tour but has not played audio for a while. By default this functionality is turned off, but you can set it up in the Site Podcatcher settings, under “Podcatcher idle time before alarm starts”.

The advantage of this method is that the warning signal will always sound after a while, unless properly handed in. The disadvantages are that if you set it to sound the warning signal too quickly, visitors may become annoyed; if you set it to sound the warning signal too late, the visitor may already be on the bus back home by the time it goes off. Further, if your site doesn’t collect Podcatchers in docks after visitors finish the tour (such as a drop-off box), they may start to produce a very annoying chorus over time.


Post-Alarm trigger

The Podcatcher can be made to play audio after sounding the warning signal using the Post-Alarm trigger in a stop. This will make the stop play its audio after the warning signal has stopped playing (either due to it playing for its full duration or a button being pressed). This is – as all content is – localized to the language of the tour.

Important changes for the Podcatcher and IDentifier labels in our repair process

When we receive a Podcatcher in need of repair, we will always try to transfer the label onto the new player first. Sometimes this is not possible, in that case you will receive a new player with our label. Of course, this also applies for IDentifier labels. It is therefore important for you to have enough labels in stock yourself to be able to change a label when necessary. 

New or extra labels?

If you would like to order new or extra labels, please contact our Customer Support at helpdesk@guide-id.com


What do I need to keep in mind when designing my own (self-service) furniture?

Designing your own furniture

If you would like to design a furniture for our Podcatchers, you can choose between a design using loose Dockingstations or a design where you use a cabinet block which you slide into the furniture.

When you are designing a furniture this is what you need to keep in mind;

  • The design is of course very dependent on the number of Podcatchers that you want to supply to your visitors. (Make sure to think about the future, when you might want to add players).
  • Per 10 Podcatchers you will receive 1 Dockingstation
  • When designing for loose Dockingstations; each Dockingstation has its own USB cable (and power-adapter with older Dockingstations) which needs to be connected to the Syncbox. So make sure to keep enough space available behind the Dockingstations for these cables (and extension courts when needed)
  • Up to 10 Dockingstation (or 1 cabinet block) can be directly connected to one single Syncbox, which in turn needs to be connected to the internet. The cable length of the USB cable from each loose Dockingstation to the Syncbox  is 90 CM, so the Syncbox needs to be placed near the Dockingstations. Because the USB cables also power the dockingstations, a Hub can not be used to extend the length of the cables.
  • When using a Cabinet block the cables are already connected inside the block and the Syncbox is placed in the back if the block (see the manual)
  • When designing for loose Dockinstations; keep room for the Syncbox(es). Depending on the set up, you will probably have to use multiple Syncboxes (100 Podcatchers can be connected to 1 Syncbox)
  • It is also important to take into account where you place the Syncbox because it must be easily accessible if you have to restart it.
    In addition, it is also important that you have easy access to the back of the furniture unit, if there are problems with a USB cable / power adapters /extension cords / switch etc.
  • The entire setup must be connected 24/7 to power and a wired internet connection for the correct operation of the system.
  • Also make sure the furniture has enough possibilities to ventilate warm air.
  • Don’t place the top row with Dockingstations to high, otherwise you cannot see the lights (the status) of the Podcatchers
  • Don’t place the bottom row with Dockingstations to low.
    Each Podcatcher is equipped with a neck lanyard. When the Podcatchers are placed in the Dockingstations, the lanyards hang down. So if the bottom row is to low,  the lanyards will hang on the floor.
  • We recommend to place the lowest row of Dockingstations at a height of  at least 100 cm from the ground.  That way they are still easy to access for infants and visitors in a wheelchair.
  • We have 4 info-graphics available that explain the handout of the Podcatcher which you can add to the (self-service) furniture if you like; https://help.guideid.com/kb/icons-for-signage/

Also important

We strongly advise not to use drawers in your furniture design for the distribution of the Podcatchers for several reasons; the USB cables (and power adapters) that are connected to each Dockingstation will be under tension constantly when sliding the drawers in and out. In addition, the cords can easily get stuck and you cannot properly detect wear on the wiring. Chances are also very high that cables are pulled from the Syncbox so no connection can be made when synchronizing, which in turn ensures that not all Podcatchers are synchronized

Take your visitor flow into account (with self-service, the amount of visitors able to access the furniture at the same time) and how you would like to lead them. When having one furniture for instance there are 2 flows; visitors who have just entered the museum and need to be able to easily access the furniture, to take out and activate a Podcatcher. While the second flow (visitors who are leaving the museum) must return their Podcatcher. These two flows should not interfere with each other.

Placement of the Start IDentifiers

To activate a language, you need to point your Podcatcher at a Start IDentifier. These are always placed at (or near) the distribution point.
You can either integrate them in the furniture or make a separate board where people can activate their Podcatchers (so separate from the furniture). A reason to do so, could be the visitor flow, or because of  limited space around the furniture.

If you do integrate them into your furniture, please make sure not to place them flat (with a table design) or underneath the last row with Dockingstations (with a wall design).

Other important information about placing your (Start) IDentifiers can be found here.

Casing of the Identifiers

If you prefer to place the Identifiers in a casing, please keep in mind that our Identifiers are equipped with Bluetooth functionality. The Bluetooth signal cannot be transmitted through metal. This means that Identifiers cannot be placed in a metal casing.

Furniture examples

Covid 19 – Audio files

We have recorded a few standard phrases which you can use and add to your audio guide. E.g. “please make sure to keep 1 ½ meter distance from each other. Follow the one-way path in the museum to avoid having too many people in one area.”

The phrases are available in 4 languages and can be downloaded using the following links; 

Covid 19 – Text & Audio – NL
Covid 19 – Text & Audio – EN
Covid 19 – Text & Audio – FR
Covid 19 – Text & Audio – BE

Tip! You can also use the text provided in the examples above to translate and record in other languages.

What are the payment methods?

Bank transfer


Update October 2023:

Guide-ID B.V support the following payment methods:

Europe (accepting EUR and GBP)
Guide-ID B.V. has a bank account with Rabobank
IBAN (account number): NL27 RABO 0119642182
SWIFT (BIC): RABONL2U
Please quote reference: Invoice number xxxxxx (see invoice for details)

United States (dollars)
Guide-ID B.V. has a bank account with WISE
Account number: 8311264538
Routing Number (ACH or ABA): 026073150
Wire routing Number: 026073150
Bank code (SWIFT/BIC): CMFGUS33

Address: 30 W. 26th Street, Sixth Floor New York NY 10010
Please quote reference: Invoice number xxxxxx (see invoice for details)

Check payments
PLEASE NOTE: Check payment are NOT accepted and will not be processed.

If you have any additional questions, please send an email to:
billing@guide-id.com

How to contact our customer support department?

Our customer support department can be reached by telephone or email from Monday through Friday from 08.30 o’clock in the morning until 17.00 o’clock in the afternoon (CET, Amsterdam)

Telephone number:  +31 (0)570-572202 (option 1 support)
Email:                           helpdesk@guideid.com

If we cannot be reached by telephone, during opening hours, your call will be forwarded to our telephone service. Your message will then be passed on to our employees to follow up.

Your email will be read during our opening hours and responded to, accordingly within three days. If we cannot be reached by email, you will receive an out of office message with instructions. 

In case of emergencies during the weekend, you can reach us via WhatsApp on +31638072466  from 08.30 o’clock in the morning until 17.00 o’clock in the afternoon (CET, Amsterdam). We will response to your emergency within 3 hours.

(An emergency would be out-of-use Podcatchers so visitors cannot use the audio tour. Or when the Podcatcher Portal is not available).

In case you are not happy with a moment of contact with us, please let us know. You can contact our helpdesk or if this doesn’t feel right, contact the Business Managers.

How to add a survey (enquête) to your tour?

Guide ID can provide a standard survey which you can add to your tour.
It is one Stop and contains the following content;


Standard survey content

Thank you very much for visiting. We would greatly appreciate it if you would take a few moments to answer a few simple questions. This will take no longer than 2 minutes.

Press any button to start

1. What is your gender?
Press A for male
Press B for female

2. What is your age?
Press A for 20 years or younger
Press B for between 21 and 50 years
PresC for 51 year or older

3. How far did you travel to visit the museum?
Press A for less than 20 kilometers
Press B for between 20 and 75 kilometer
Press c for more than 75 kilometer

4. How did you become aware of this exhibition?
Press A for via the internet
Press B from family, friends or acquaintances
Press C for other media

5. How would you rate the exhibition?
Press A for excellent
Press B for good
Press C for average

6. How would you rate the content of this audio tour?
Press A for excellent
Press B for good
Press C for average

7. How did you find the use of the handset during the tour?
Press A for very easy
Press B for easy
Press C for complicated

Thank you for you participation. Your feedback is very much appreciated and will be used to improve our visitor services. We hope to see you again soon!


The standard survey is available in 6 languages; Dutch, English, German, French, Spanish and Italian.

If you would like to implement it in your tour you can contact us at helpdesk@guideid.com and let us know. We will then send out an IDentifier (with a survey label) for you to connect to this new stop. Or you can connect a spare IDentifier you already have. 

Once the survey is in use at your museum, you can view the visitor answers in your Analytics using the “selected options”

Adding your own Survey

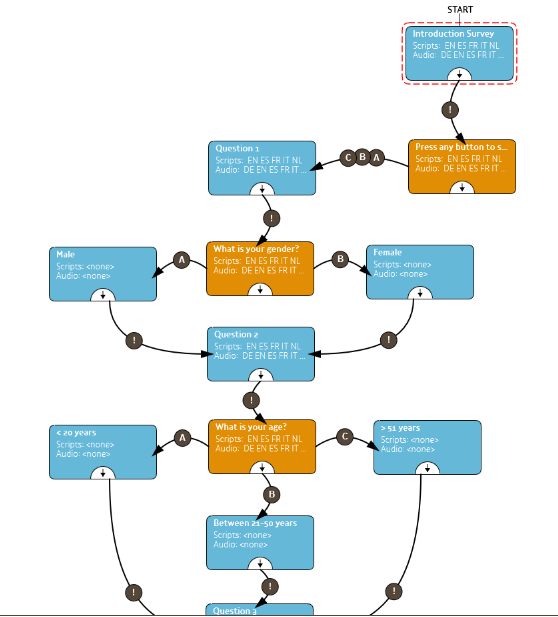
Like any other Stop, you can also create your own survey and add any question and answer possibilitie you wish. You can build the right structure in a Stop using the Clip flow editor. (Click here for more information about adding and editing clips in a Stop). Tip; make sure you do not add more then 7 questions (preferably 5) because we know from experience that visitors don’t have the patience to answer the whole survey when asked more questions. 

The right structure for a survey in your Stop should be;

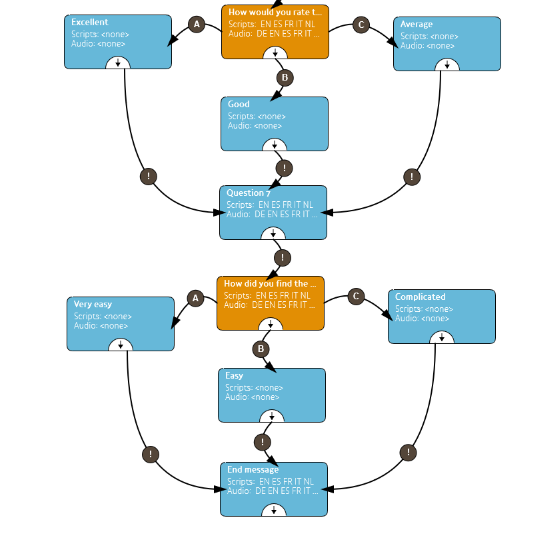
As you can see in the picture above, it’s important to separate the question (blue clip) and the answer possibilities (orange clip) in two separate clips in order to keep the functionality of the volume and pause/play buttons available when the question is being played. Also always add a short description of the question in the clip title that plays the answer possibilities (example; what is your gender?) and in the clip title of the A/B/C choice clips (example; A = male)

At the end of the survey you can connect the last A/B/C clips to an end message.

How to make a quiz or add a kids tour

Basic

You can add layers in a Stop to provide extra information to your visitor (for example;  “if you’d like to know more about the painter press A, if you would like to know more about his style of painting press B etc). But you can also use the layers if you would like to add a quiz question in a Stop. You can achieve this by adding A/B/C options in your Clip flow for that specific stop.

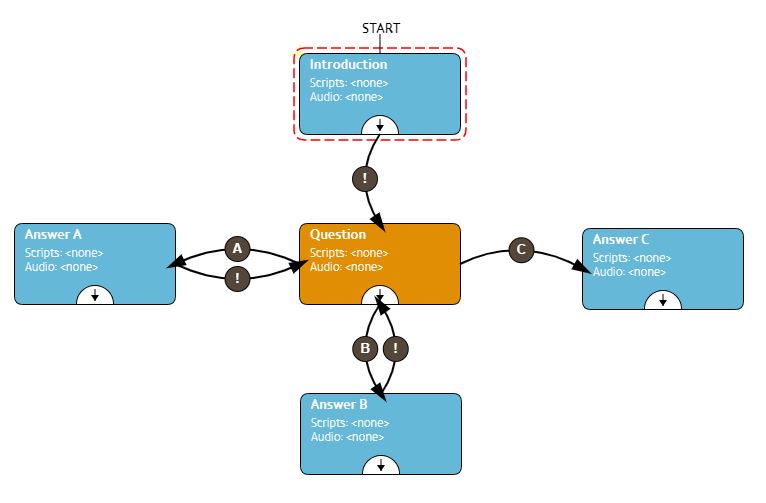
Note; If you would like to use such a flow, we recommend starting out with an introductory Clip, which connects with an ‘Auto continue’ to the actual question clip, which then connects to the possible choice clips A, B, and/or C. You need to use this flow so the visitor can still adjust the volume on the Podcatcher or use the pause/ playback button, while the audio is playing but no question is yet being asked.

The example below shows a A/B/C flow used for a quiz Stop. When the Stop is triggered, the introduction will play first, explaining what this Stop is about. It would have content like “The Podcatcher is an amazing device. It was made by ….”. When the introduction Clip’s content finishes, the question will be posed (yellow clip) for example “The first Podcatcher was built in which country? Press the ‘A’ button for the United States of America, ‘B’ for Japan, or ‘C’ for the Netherlands”. When option A is chosen, the ‘Option A’ clip would play “That is not correct. The Americans did not build the first Podcatcher.” and a similar Clip for option B. Both of them would ask the question again, since they have an ‘Auto continue’ connection back to the question Clip. Option C would yield “That’s correct! The first Podcatcher was built in the Netherlands in the early 2000s.”. The flow then ends, as there are no more connections to follow.
Adding a quiz Stop to your “standard” tour can be a fun addition to the content, but it is also a great way for setting up a kids tour. Imagine all the fun questions, extra information or sounds you can add to make a cool tour especially for children. You could take them on a treasure hunt where they get clues by selecting the right answer to a question, or when choosing an A/B or C option.  The sky is the limit, it only takes some extra effort and imagination.

Would you like to add a kids tour for the children visiting your museum?

It is very easy to add a kids tour at your museum while making use of the same IDentifiers which are already in place at the museum in your standard tour. To do so, you have to add a new tour > copy the Stops from the standard tour to your new tour (don’t forget to select the triggers to be copied as well) Note; do not use “add existing” when adding the new stops but make sure to copy them! > then alter the Stops in the new tour with the new content. You can even add or remove clips, that is no problem. You will only need to add a separate Start IDentifier for this new tour.

If you would like the adults to be able to listen to the content of the kids tour as well, or vice versa, you will need to place 2 IDentifiers with each object in the museum, one to trigger the adult (standard) content and one to trigger the kids content. In that case you can add the new kids Stops to your standard tour and do not need to add extra Start IDentifiers.

Note; if the kids tour (or Stops) is (are) not available in the same languages as the standard tour, you need to set the fallback for the other languages

Would you like to add points to collect to your kids tour Stops?

Quiz question stops are often used in a kids tour, because they can add a lot of fun to the tour. To make it even more interesting for (older) kids, you can also add points to the right answer in a Stop for the kids to collect! The Podcatcher keeps track of the points collected.

Before you can start adding the points in the stops, you have to think about how many questions you have, how many points you would like to add to the right answer and what the score possibilities are. Then you have to decide how you would like the kids to know how many points they have scored. There are two possibilities; 

1. You can either choose to let the kids know exactly how many points they have scored.
2. Or you can set up different categories and, depending on the amount of points they collected, assign them to a specific category (for instance gold, silver, and bronze)

So here is an example; you have 10 questions,  for each right answer they get 5 points. That will give you the following possibilities;

 0  points – no right answers were given
 5  points – 1 right answer was given
10 points – 2 right answers were given
15 points – 3 right answers were given
… etc …
50 points – all 10 answers were right

Note; only the first given answer will count for points. So if they choose the wrong answer, go back to the question and the choose the right answer, these points do not count.

If you want to let the kids to know their score using the 1st possibility, you will need to record 11 audio files for the pronunciation of the scores; 0 points, 5 points, 10 points… etc… 40 points, 45 points and 50 points

Using the 2nd possibility (categories) you will have to divide the points into the number of categories. For example;

 0-15  points – Bronze
20-35 points – Silver
40-50 points – Gold

You will then only have to record 3 audio files. (Example gold;  “wow you are an expert! you have earned a golden medaillon” or silver; “you didn’t have all the questions right, but you have earned a silver medaillon!” etc.  This also allows you to really handout something special for instance a gold, silver, or bronze medallion / star.

Adding points to the “right” clip in a Stop

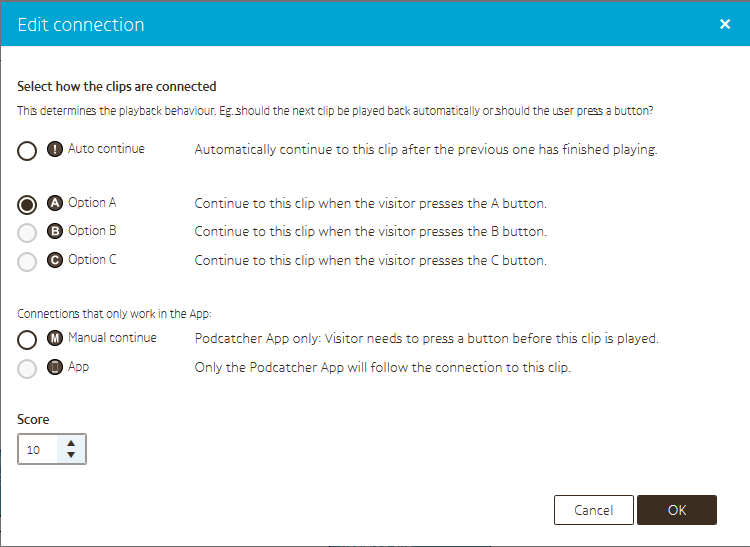
When you select A/B or C you can immediately add the points in the field Score. Note; your site has to be set to this mode by Guide ID. If you cannot add a Score in the screen please contact us at helpdesk@guideid.com and we can implement this setting on for you.
But how can the kids read out their score?

You can let the kids know their score during the tour and of course their final score at the end of the tour.  The way to do this is by adding a special Score clip in a stop. This can be added in a stop which also contains a question, or an stop specially added for reading out the score. You can even add an instruction for instance “press A to hear your score so far”.  The only limitation is you cannot add another clip after the score clip

To add a Score clip select “add a clip” in the Clip editor and choose Score.
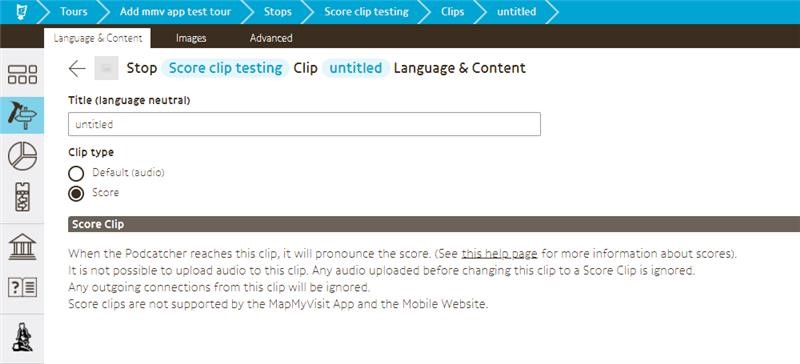
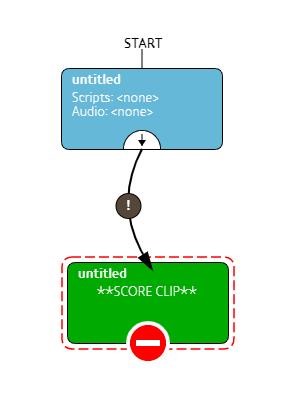


In the clip flow you will then see the green clip added. As soon as the audio from the clip above has been played it automatically goes to the Score clip, and this activates the action on the Podctacher to run the logs to read out the collected points and then play the right audio which pronounces the score.

Note; This whole setup is different then the old way where you had to use a special Score IDentifier to read out the scores. These are not being produced anymore. So if you use(d) this in the museum for a tour, you will have to make some adjustments to the tour!

Adding audio stops for the pronunciation of the scores

To be able to playback an audio file which tell you the score (when pointing at a Score IDentifier) you need to record and add these to your tour, just as any other Stop. So in the example above, if you chose to pronounce the exact score you will need to add 11 Stops in your tour or when using categories, 3 Stops. 

The next step is to add triggers to these score Stops (not actual IDentifiers but score pronunciation triggers) which can be found when you select “show more” when adding a trigger. Note; you can only choose these triggers if your site has been set to this mode by Guide ID. So if you cannot select them contact us at helpdesk@guideid.com and we implement this setting on for you.
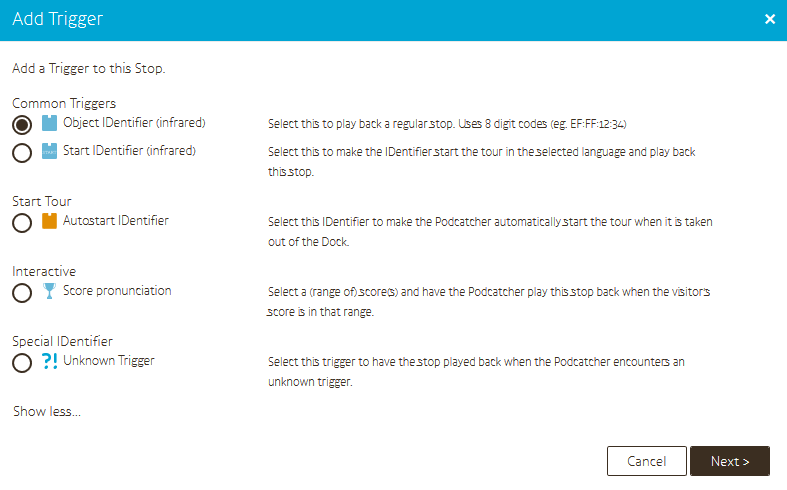
When you have selected Score pronunciation, a new screen will pop up in which you can add the score;
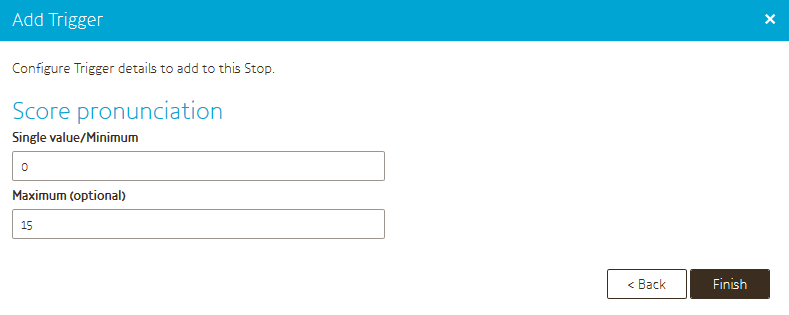
When using exact scores you only need to fill in the actual score for that stop in the field Single value / Minimum.

If you use categories you enter the lowest points of that range in the field Single value / Minimum and the highest points of that range in the field Maximum.

When you press finish the triggers will be added to your stop. For a single score stop it will show one trigger, for a category it will show all the triggers in that range.