Brainbox manual

Understanding AV-Sync

AV-Sync is an innovative feature that enhances the way audiences enjoy multimedia presentations. With AV-Sync, audio content is perfectly synchronized with video content. This means an unlimited amount of visitors can watch a video displayed on a screen and listen to the corresponding audio track on a Podcatcher, all in real-time and in their preferred language.

By offering multiple language accommodation, AV-Sync ensures that every visitor, regardless of their language preference, can have a fully immersive, personalized, and synchronized audiovisual experience.

Enabling AV-Sync

This guide walks you through the process of setting up AV-Sync, ensuring compatibility, preparing and testing your files, and conducting a flawless tour. What we will achieve is extracting the existing audio track from the video and replacing it with a time code. The original audio track will be transferred to the Podcatchers, allowing visitors to listen in real-time. Don’t worry, the original video will stay intact.

Step 1: Preparing the Movie File

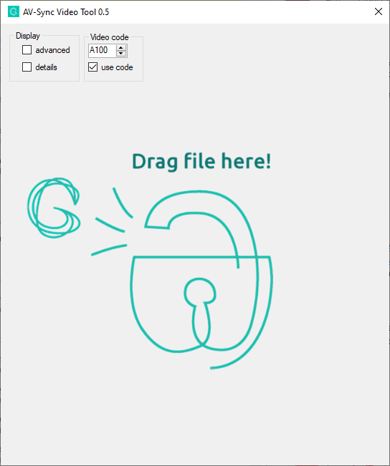
Use the Guide-ID AV-Sync Tool to process your original movie file. Assign a unique Video Code to each movie file – starting with “A1”. The tool generates two files: one for video playback on the media player and an audio file to be uploaded to the Guide-ID Portal.

Both files will be exported to your computer next to the original video. The audio file ends with “_audio” the video with the added timecode end with “_video”.

You can download the AV-Sync video tool here:

https://help.guideid.com/downloads/AV-Sync_Video_Tool_0.4.exe

Step 2: Adding the Audio File to the Portal

Log into the Guide-ID Platform, and create a new AV-Sync stop. Upload the audio file generated by the AV-Sync Tool. If you have alternate languages for the tour, upload these audio files as well. They should have the same length as the original audio.

Enter the Video Code you’ve chosen in the tool in the Video Code box. Also add a Beacon Lite that visitors can scan—its code is found on the beacon’s back.

Step 3: Test the Video Playback

  1. Begin playing the video on the media player to ensure it is displayed correctly on the screen.
  2. You will note a beeping sound, don’t worry. This beep is translated by the Brainbox to a time code.
  3. Make sure that the volume on the media player is unmuted and set to an appropriate level, ensuring it is neither too quiet nor too loud.
    1. Setting the volume to 30 or 40 % is mostly perfect.

Step 4: Brainbox Setup

Now, connect the supplied cables:

  • Use a 3.5mm Jack cable to connect the media player (or TV) to the Brainbox.
  • Use the IR Out connector to connect the RCA cable to the supplied AC-Sync IDentifier with the Brainbox
  • Connect the USB-C cable to the power adapter or use a USB-A port on the media player.
    • Both the led’s (WiFi and AV-Sync) blink Orange once.
  • Press the small switch button on the Brainbox.
    • The AV-Sync LED will turn orange. Indicating Auto Gain has started where the Brainbox is searching for the best setting. The LED light will flash green within around 15 seconds; all done.

Step 5: Test the Tour

Lastly, ensure that your tour is published and synced on the Guide-ID Platform. Test the tour’s audio by playing the AV-Sync stop on the Podcatcher or holding your phone close to the Beacon if using an app. Point the Podcatcher or phone at the AV-Sync IDentifier and ensure the expected audio starts playing, indicating a successful setup.

Following these steps will provide a seamless and enjoyable tour experience for your audience, further enhanced with the power of synchronized multimedia delivered by AV-Sync.

Understanding the LED Indicators on Your Brainbox

Make sure the Brainbox is connected to a mediaplayer with a running video

color AV-Sync LEDMeaning
Green blinkingthe AV-Sync signal is functioning correctly, ensuring perfect audio-video synchronization.
Orange (1 short blink)The Brainbox is powered on.
OrangeAuto gain is in progress. It’s fine-tuning the settings for optimal audio synchronization. it’s started and stopped by pressing the switch button. If it takes more than 15 seconds you need to check the audio volume of the media player. Make sure it’s unmuted and not too quiet.
Red blinkingThe Brainbox is receiving an audio input, but it’s not the correct AV-Sync track. Test the audio output of the media player with headphones or speakers to check if you can hear the AV-Sync track (beeping noises at regular intervals).If you don’t hear the beeps, the AV-Sync track isn’t added to the video or the audio output isn’t selected on the player. Alternatively, the audio track was added to the left channel.Alternative, adjust the volume by lowering is 20 %. restart the auto gain by pressing the switch button.
offNo audio signal is being processed. Verify the volume on the media player. Note, when plugging in the USB-C cable it wil blink orange once indicating it’s powered.

Remember, the Brainbox doesn’t need a Wi-Fi connection to work; it just needs power (through a USB-C 5V adapter) and the correct audio signal from a media player. With AV-Sync, your visitors can enjoy videos in perfect harmony with audio, in real-time and in any language. Setting up your Brainbox is the first step to offering an immersive and synchronized audiovisual experience!
AV-Sync Installation video

To give you a good impression on how to add an AV-Sync stop in your tour, we have made a short video. It briefly takes you through the steps; how to prepare the video, what to do in the Toureditor and how to connect the hardware. Detailed information can of course be found in the AV-Sync IDentifier articles on this helppage.

Mobile Website Friendly name and QR Code

The Podcatcher Portal allows you to download a QR Code you can print and put somewhere in your museum. This enables visitors to quickly enjoy your tour online, without requiring IDentifiers or other hardware.

Further, you can use a “friendly” name instead of the generated Mobile Website code. This means you can refer to the Mobile Website using your museum’s name instead of the code, if you wish.

You can find the controls on the Manage Site page:

Note that you can download QR codes for your museum as a whole (on the Site page), for a specific tour (on the Tour – General page) or a stop (on the Stop – General page). However, you can only enter a friendly name for your museum.

Quick Installation Guide

As soon as you have made your tour in the Podcatcher Portal you can install the received hardware. Haven’t you made your tour yet? or need instructions? please have a look at this page; getting started

Installing the hardware

Connecting the IDentifiers

You can finalize your tour by connecting the IDentifiers (triggers) to the stops in the tour. You need to connect at least one IDentifier to each stop in your tour. Every IDentifier has a unique number which you can find on the back of the IDentifier (for example EF:FF:FF:43).

There will be 1 or more IDentifiers with a language/country flag, these need to be connected as a Start IDentifier for the different languages in which you provide the tour. (Note; you need a different IDentifier for each language).

When all the stops are added in the tour (have an IDentifier connected and contain an audio file) you need to “publish” the new tour. After that you can mount the IDentifiers next to the objects in the exhibition.

The rest of the installation is very simple;

Connecting the Synbox to the portal

First you need to connect the Syncbox to your site in the portal:

  • Open the Portal and login to your account
  • Select the Sync module on the left
  • Click the button “Add Sync Console”
  • Select Syncbox as device type
  • Fill in the details in the dialog. Both the Serial number and the Link key can be found on the label on your Syncbox
  • Your Syncbox is now ready for use!

Connecting the Dockingstation and the Syncbox

Now you can connect the Dockingstation and the Syncbox:

  • Connect the Dockingstation to the Syncbox that we have provided into one of the 10 available USB ports on the front, and plug everything into the power socket.
  • Insert the Podcatchers firmly in the Dockingstation
  • Connect the Syncbox to a wired internet connection using the USB port on the back (note the whole set up needs to stay connected to power and internet 24/7)
  • Start the Syncbox
    • Power on the Syncbox by briefly pressing the ‘shutdown’ button
    • A pen may be required to reach the button
    • This is only required if the Syncbox was previously shut down using the button
  • Log on to the Podcatcher Portal, go to “sync” and press Sync Now.
  • Now the content will be synced on to the Podcatchers, one after another
  • When a Podcatcher light turns green, you can take it out and start testing your new tour.

We have made an instruction video which is available as well.

Every day our server connects with the Syncbox, to ensure updates are written on to the Podcatchers, to restore Podcatchers which have an error and to retrieve the logs and statistics from the Podcatchers to add to the Analytics.

Please feel free to contact helpdesk@guideid.com if you have any questions.

Good luck with testing your new tour!

AV-Sync Testmode

The AV-Sync Testmode is a Podcatcher mode which gives acces to 2 AV-Sync specific features to setup your AV-Sync clips. The mode is used for the following cases:

  • To determine the desired AV-Sync offset
  • Measure an estimate for the AV-Sync loopdelay.

Note: when you are already content with the synchronization between the Podcatcher audio and the video, you do not require these features.

Usage

The AV-Sync testmode is activated by removing the Podcatcher from the dock whilst holding the middle (B) and right (C) buttons at the same time. The testmode is recognised by the yellow led which blinks together with the green led when a tour is started.

AV-Sync offset

The AV-Sync offset is used to adjust the synchronization between the Podcatcher audio and the video by playing the audio a fraction earlier or later.

The following instructions explain how the testmode is used to determine the desired AV-Sync offset value.

  1. Aim the Podcatcher, in AV-Sync testmode, at the AV-Sync IDentifier.
  2. Use the left and right buttons to in- or decrease the AV-Sync offset on the Podcatcher. After every press the value is pronounced* .When pressing the middle button the value is reset to 0.
  3. Re-aim the Podcatcher to the AV-Sync IDentifier. The audio will now be played with the selected AV-Sync offset. Notice the red led which indicated the audio is played with an offset.
  4. Repeat from step 2 until you are happy with the synchronization.
  5. Press the middle button while audio is playing to pronounce the last used offset value. Enter this value as AV-Sync offset for this AV-Sync clip.

* Minus is pronounced as “Foxtrot”

AV-Sync loopdelay

With the AV-Sync loopdelay the audio can be brought back in sync after a loop, by delaying the audio.

The following instruction explain how the AV-Sync testmode is used to make an estimate for the desired loopdelay value.

  1. Aim the Podcatcher, in AV-Sync testmode, at the AV-Sync IDentifier.
  2. Await the video loop and aim at the AV-Sync IDentifier again around 10 seconds in the video.
  3. The Podcatcher will pronounce an estimate of the desired loopdelay value. Enter this value as AV-Sync loopdelay for this AV-Sync clip.

Due technical limitations the Podcatcher cannot determine the exact value. Try the following to make a better estimate of the required value:

  • Await multiple video loops before the 2nd scan of the AV-Sync IDentifier, and divide the pronounced value by the amount of loops.
  • Perform multiple measurements and take the average.
  • Test the synchronization after setting the loopdelay, publishing and syncing. Adjust the value with little steps in case you are not yet happy with the synchonization.

Note: PC’s do not have a constant loop time when used for video playback. Use a dedicated media player for constant video looping.

MapMyVisit – Mobile Website

Mobile Website

Our new Mobile Website has been devised to give visitors the opportunity, in addition to the Podcatchers in the museum, to follow the audio tour online via their own mobile device, such as a mobile phone.

How does it work for the visitor?

By means of a QR code or a link to the Mobile Website: https://mapmyvisit.com/listen and entering your unique code there, the visitor can download and listen to the tour. This is done quickly and user-friendly!

User-friendly for deaf and hard of hearing visitors

Because text and images are displayed in the tour via the Mobile Website, it is also user-friendly for deaf and hard-of-hearing visitors.

How does it work for you as a customer to install this?

This is very simple! The tour is already ready for the Podcatchers in the Portal, so this is easy to activate for the Mobile Website. The Mobile Website also shows images and text, so if this is not already included in the tour, you can easily add it. How to do this is explained below.

How do I prepare my Tour for the Mobile Website?

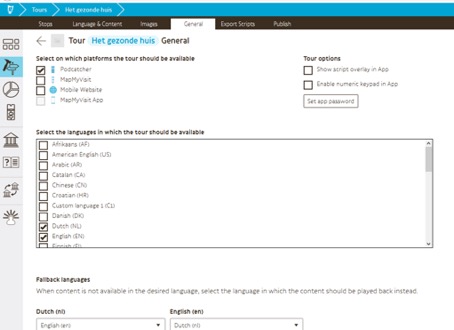
As we indicate above, you can make the audio tour available via the Mobile Website in the Portal. You can do this by:

  • Go to the Tour editor in the Portal
  • Select the tour you want to use for the Mobile Website here
  • Open the tab: “General”
  • Check “Mobile Website”
  • And click “Save” at the bottom

Enable stops for the Mobile Tour

Now you can choose which stops you want to use for the Mobile Tour. To do this, go to:

  • “Stop list” in the tour
  • Click on the globe icon at each stop and set the availability

What should the stops have?

The Mobile Website shows images and possibly text. In this way, the visitor knows, for example, which painting or object the audio fragment belongs to.

For the tour itself it is possible to add an image and a logo. Visitors will see this when they open the Mobile Website.

You can add an image per stop, but also a description. This is possible per language. This way, all visitors can follow the online tour in different languages.

  • For the ultimate experience, we therefore recommend per stop:
  • Add an audio file (required)
  • Adding an image, so that visitors have an image with the audio clip.
  • Add text. For example, deaf and hard of hearing visitors can also follow the tour.

Where can I find my unique code?

A unique site code is available for you in the Portal. Proceed to:

To go to https://portal.guideid.com/ and log in, you can then click on “Manage site” then choose: “Mobile Audio Tour Web App”

You will then see the following in the Portal

This is the unique site code that can be entered by the visitor to download and then follow the tour.

Can I choose my own code?

The code is unique and therefore cannot be modified.

How do I create a unique QR code?

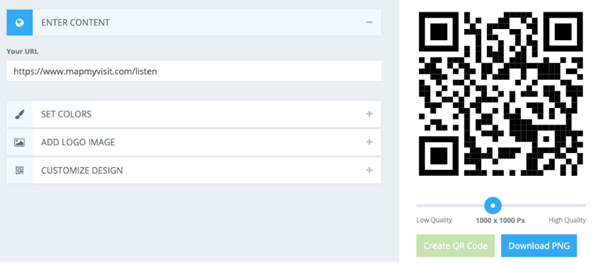
If you want a QR code to hang at the entrance or to place on your own website, you can create it via: https://www.qrcode-monkey.com This is a free tool. By typing here the link to the Mobile Website including the unique code, a unique QR code is created.

  • Enter the URL with your unique code behind it: mapmyvisit.com/listen/ (your unique code)
  • Choose: “Create QR Code” *
  • Then choose: “Download PNG”
  • The unique QR code has now been created and can be displayed at the start of the tour or posted on the website.

* We recommend to leave the color of the QR code black.

The numerical IDentifier

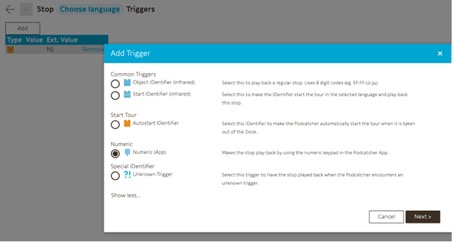
The stops in the Tour are displayed in the same order as the Tour editor in the Portal, but it is also possible to set a numerical trigger for each stop. This allows you to determine the correct order on the Mobile Website. To use this function, go in the Portal to:

  • “Triggers”
  • “Add”
  • “Show more”
  • “Numeric (Apps)
  • “Next>”

Here you can enter the number for the stop:

Repeat these steps for each stop.

You are ready!

The tour is now completely ready for the visitors!

Do not forget to post the unique QR code or the link with the unique code from the Portal at the entrance.

Have fun offering the audio tour via the Mobile Website!

MapMyVisit – App

Overview

Guide-ID offers its customers a new and improved App, called the MapMyVisit App. This is a Bring Your Own Device (BYOD) alternative to the Podcatcher. The App has been designed with the Podcatcher experience in mind, so a lot of it is comparable in functionality. The App uses Bluetooth Low Energy (BLE) technology built into the new Bluetooth IDentifiers. These IDentifiers can be used to trigger both Podcatcher and the App. Usage data is logged, processed, and finally displayed in the Analytics section of the Portal.

How the App works

The MapMyVisit App can be downloaded free of charge by your visitors and is installed from either the Google Play Store for Android or the Apple App Store for Apple devices. Installing the App can be done from home or when present at the museum. On arrival at the museum, the visitors unlock and start the tour at the IDentifier starting point. It is also possible to start in the middle of a tour and use the App to select both the language and tour. But off course make sure the museum has our new Bluetooth IDentifiers available on site for the visitors to scan!

Note, the MapMyVisit App supports the following content/trigger types:

  • Normal audio stops
  • A/B/C-stops
  • Autostart
  • Sign language stops (video content)
  • Streaming audio by using an active internet connection
  • The MapMyVisit-App only supports Bluetooth-capable IDentifiers. 

Getting the Tour ready in the Portal

Building a tour for the App works the same as making one for the Podcatcher. You need 1 Start IDentifier for each language (to start the tour) and 1 Object IDentifier for every stop. IDentifiers you add to stops can also be used by the Podcatchers, as they both support Bluetooth and infrared. Follow the next steps to get it ready:

First, make the tour available on the MapMyVisit-App. Do so by ticking the box on the Tour General screen and click save. If you start fresh and create a new tour you can do so in the “add tour” popup. 

Second, decide which stops you want to have available in the App. Stops can be identified at a glance in the Stops list. Clicking on this icon will also take you to the Stop General screen, where you can toggle the App availability on or off.

Start at any IDentifier

By offering the app it is possible to start a tour without scanning a Start-IDentifier. If enabled, visitors can start an audio tour even when they already entered the site and noticed other visitors enjoying the tour. To make this work; ticking the box on the Tour General screen and click save. Note, for each language there still needs to be a Start-IDentifier connected.

Sign language tours

A Sign Language tour is a video-only (no audio!) tour. It is intended to help hearing-impaired visitors enjoy the museum to its fullest. 

Follow the next steps to get it ready:
First, make sure the tour you are going or have created is available on the app. Do so by ticking the box on the Tour General screen and click save.
Then, add a Start IDentifier and connect it specifically to the sign language tour, see image below.

Thereafter, you are able to upload your video. You can do this in the same place where you upload audio. Note, only the video will be played in the app. audio will be stripped from the file.

Practical;

  • Only upload mp4 files with a maximum of 256 MB per file (preferably files without audio)
  • Compress the files as much as possible and avoid a high resolution to stream better and faster
  • Normal format is fine (the format will not be converted in the TourEditor)
  • Ensure good WiFi coverage in the museum for fast streaming after triggering
  • Mark your IDentifier with a small symbol (for instance 2 hands) to clarify which Stops have sign language content

Skin upload (site specific image)

You can brand the MapMyVisit App for visitors visiting your site. You can upload a site-specific image in the portal which will be displayed as the background of the App. In the portal go to Manage site and open de Images tab.

Promoting the App to your visitors

You can use this QR-code to promote the app for your visitors. The QR-code redirects the visitor to the app store used on their mobile phone. (Download the .jpg file here)

We also made a leaflet that you can download and use to explain to your visitors how the App works.

App usage and build-in furniture

Keep in mind that the app does not work properly when build-in with metal, as this may interfere with the Bluetooth signal.

Installation video

We have made a video in which we show you how to add the newly received IDentifiers to your new tour and how to install the setup with loose, new Dockingstations and a Syncbox.

User manual

Sometimes, our Podcatchers need some extra attention, for example when they get into an errormode. If this is the case, the LED light on the Podcatcher will show you. Our new and updated manual will help you prevent Podcatchers going into an error state and explain what the LED light is telling you and which action to take. The manual combines the information in 3 languages; Dutch, English and French.

User manual

Tip! Print, and keep it at you reception desk!


Specsheet Syncbox

The Syncbox is a compact computer, designed by Guide ID to charge and synchronize Podcatcher audio guides. You can connect up to 10 dockingstations (100 Podcatchers) to one Syncbox.

Specsheets: