Hello, and welcome to Guide ID’s Podcatcher Portal!
The Podcatcher is our audio player and the Podcatcher Portal is our online system. We’ll guide you through our system and take you through the steps from a box full of hardware to a working audio guide.
Registering a new account
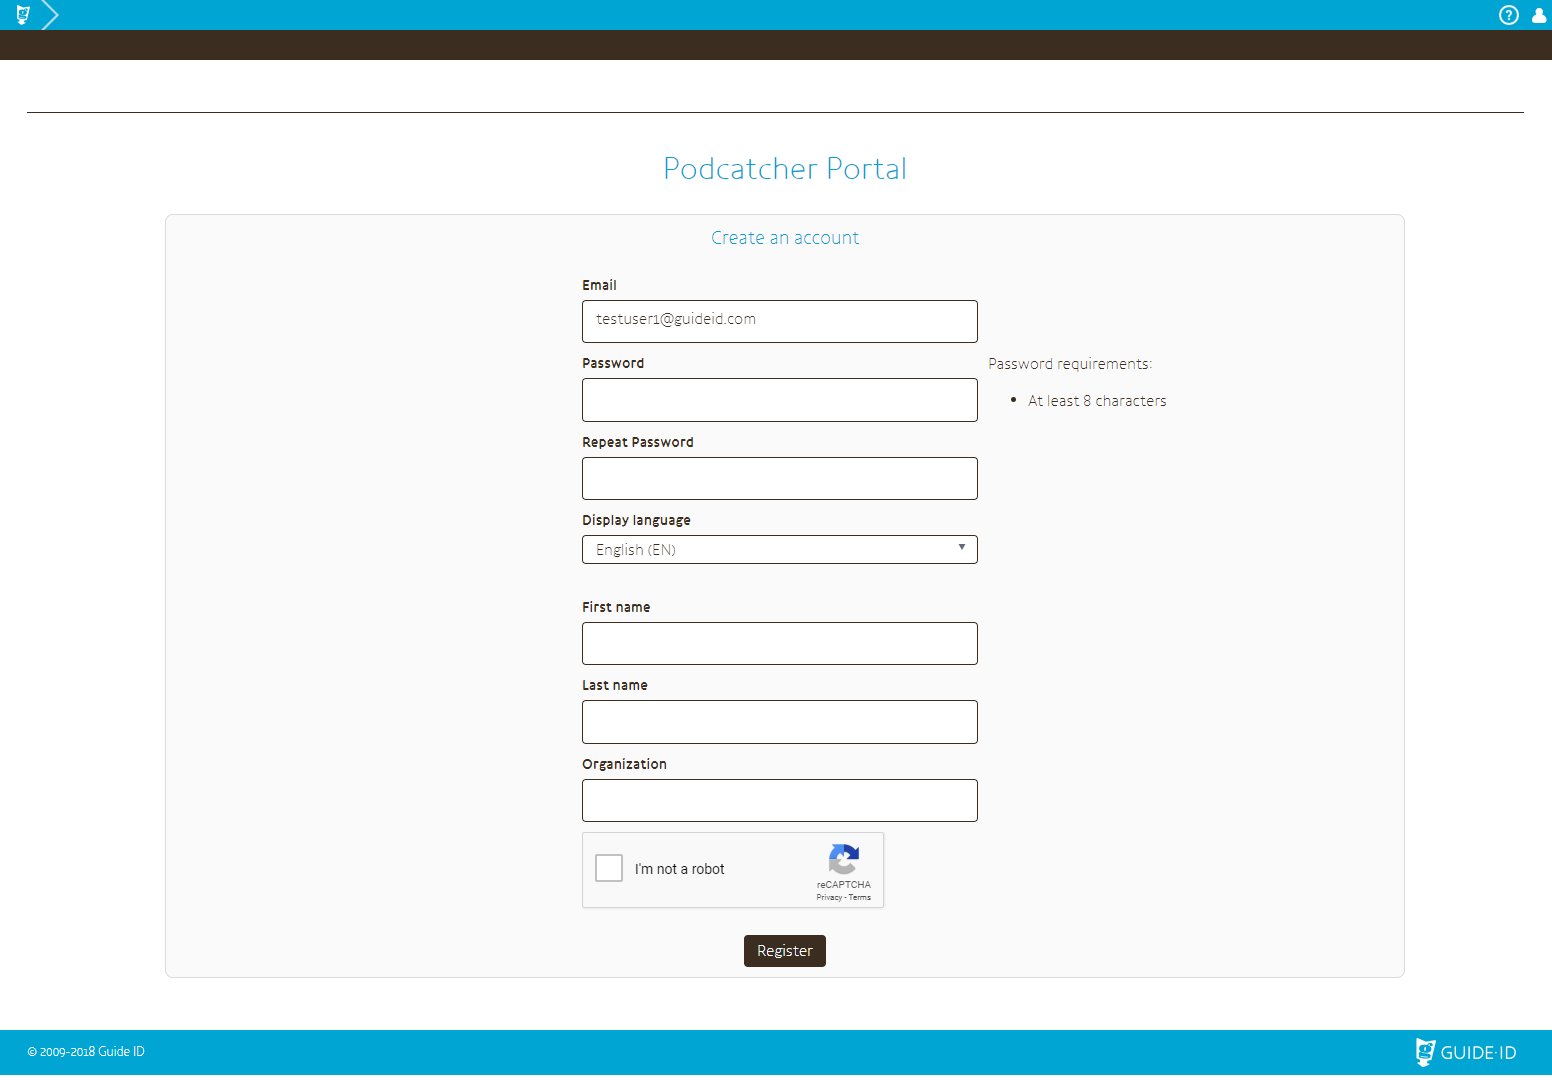
As part of the onboarding process, you will receive an invitation link to register an account with the Podcatcher Portal. If your organization has a contract with Guide ID, but you do not have an account or a link to create one, ask your site administrator (usually the person in charge of the audio tours on your site).
After receiving the invitation e-mail, click on the portal.guideid.com link to go to the account registration page and fill in the following fields.
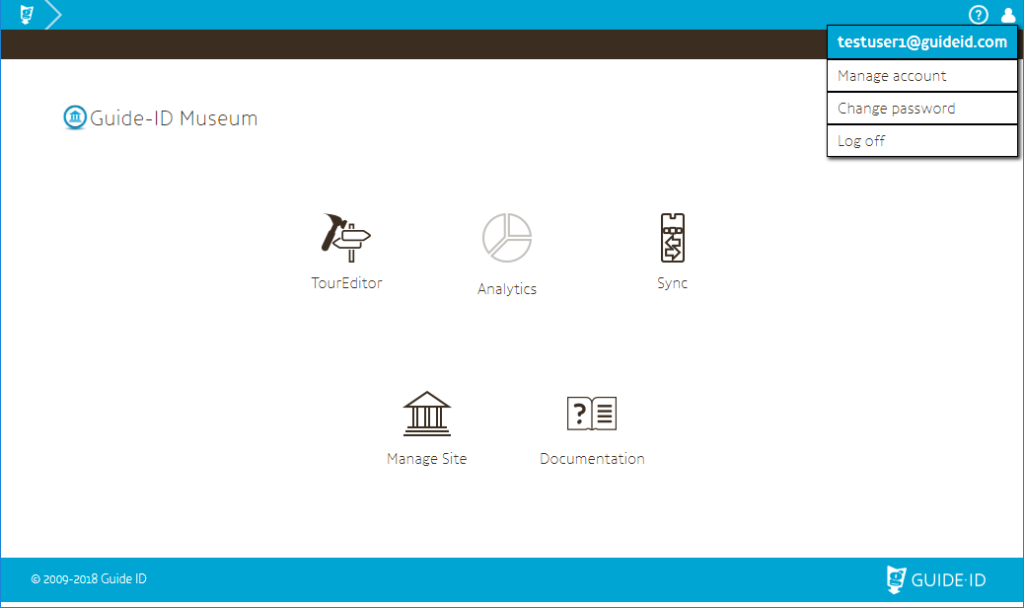
Everything about your user account and login can be found in the upper right corner menu, by clicking on the person icon.
You can manage your account, change your password or log off from the Portal.
Manage Account
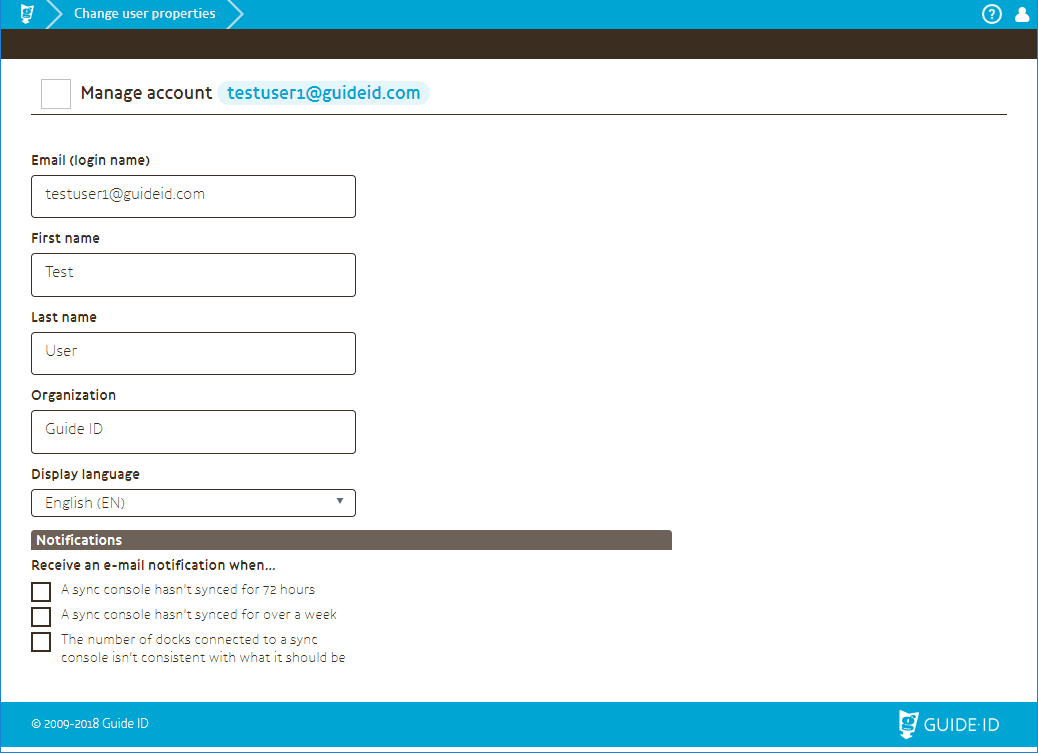
In ‘Manage account’ you can find and update the information you’ve filled in during account creation, as well as configure e-mail notification about the synchronization.
Account details
These options are fairly self-explanatory. Do note, however, that your e-mail address is also the username you use to log in to the Portal.
Warning: After changing your Email address, you have to log out, and log on with your new address to continue working in the Portal.
Notifications
Configure your e-mail notifications here. Toggle the checkboxes depending on whether you want to receive notifications for the events listed. Currently they’re all Sync related, but we’ll let you know if we add any.
Change password
Here you can change your password. Enter your current password first, then enter the new one twice. The [ Save ] button will appear as soon as you type something in one of the text boxes.
Next steps
Now that you have an account, we’ll guide you through everything you need to know about our hardware and online platform. If you want more information about the hardware we will deliver and how the system works, please read Introduction to the Podcatcher hardware. For more information about our online platform, please read the Introduction to the Podcatcher Portal.
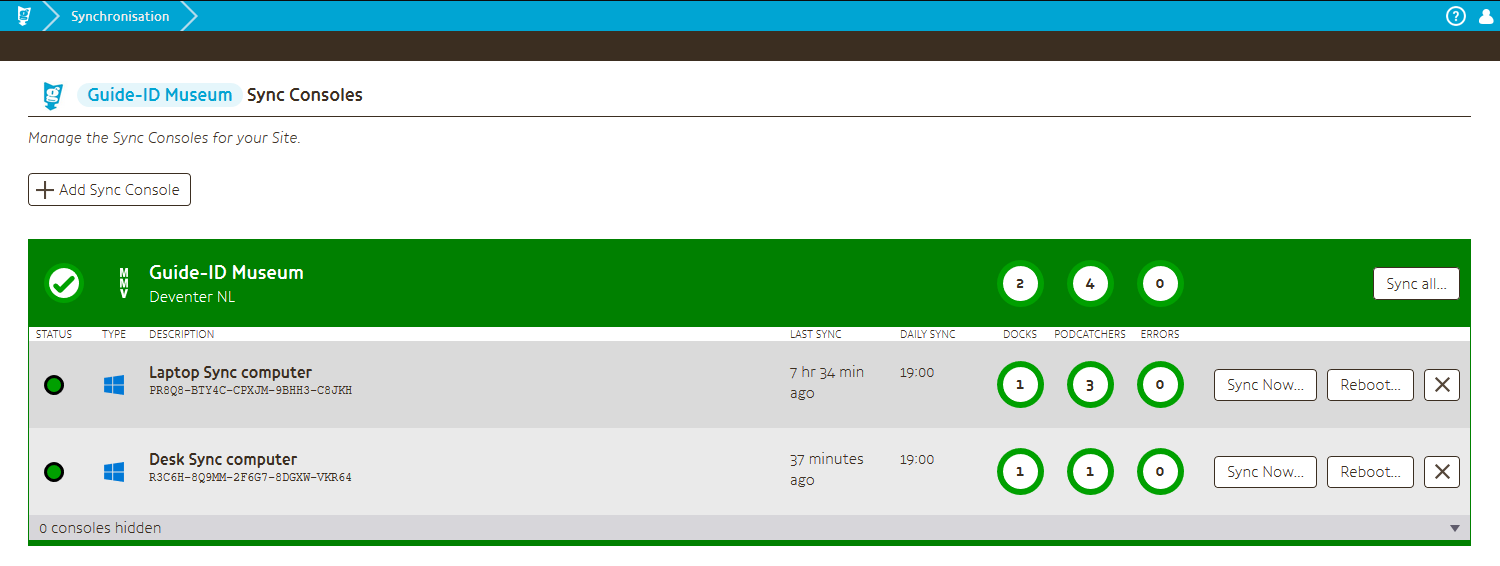
Synchronization of the Podcatchers is the process of updating them with the latest published content, uploading the Podcatcher logs to the Portal, and charging their batteries. The first screen you’re presented with when clicking on the Sync icon on the home page is the list of Sync Consoles connected to your Site.
Note: All Sync Consoles on your Site will sync the same content. If you have multiple hand-out points, it doesn’t matter where you synchronize the Podcatchers.
In the Sync Console overview you can see the consoles’ status, what happened during the last synchronization, and buttons to sync or reboot the console. You can also see at-a-glance how many Podcatchers are ready to go with the latest content, and what the consoles’ status is. Green means good, red means something’s wrong, and grey means the data is outdated.
Actions
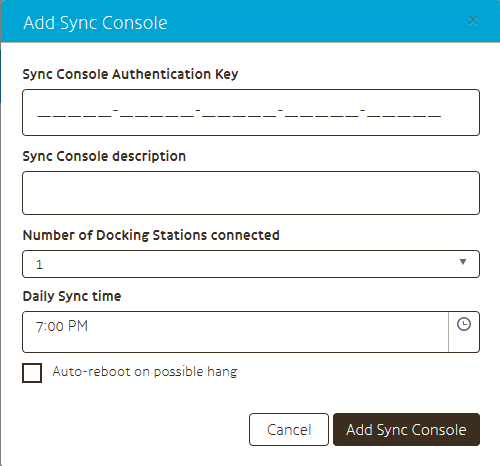
Add Sync Console
Adding a Sync Console means linking the authentication code displayed on the Sync Console to your Site so it knows which content to sync.
Sync Console Authentication Key: the code as shown by the Podcatcher Sync application on your Sync Console. Sync Console Description: A description for the Sync Console, for example ‘Front desk’. Number of Docking Stations connected: the number of docking stations that are connected to the Sync Console. The system will start warning you if this number doesn’t match the number of docks found during a sync. Daily Sync time: When should the daily sync be scheduled? Auto-reboot on possible hang: Check this box if you want to allow the Sync application to be able to automatically reboot the computer if it seems like the computer has frozen up.
The Sync Consoles overview will update itself and show the status of the recently added Sync Console. It can take a few minutes before the Sync Console shows as ‘online’ in the Sync desktop application. It can also take a couple of minutes before the new Sync Console notices its activation in the Portal.
Remove Sync Console
If you no longer want to synchronize your Sync Console, you can remove it from the list by clicking the red [ X ] button. It’s no problem to re-add a removed Sync Console at a later date. But while it’s not linked to your Site, it’s not possible to synchronize your Podcatchers on that Sync Console.
Note: Please remember to unlink your Sync Console from your Site if you don’t use it anymore, as our systems will think something’s wrong and e-mail you about it.
Sync now
When your Sync Console in online, it’s possible to synchronize it on-demand. To do so click the [ Sync Now ] button. If this button is greyed out, your Sync Console is already syncing (or stuck trying to). The ‘Sync Now’ button turns light grey as soon a synchronization is scheduled or if the Sync Console synchronization is in progress, and it’s not possible to click the button while that’s going on.
Reboot
If there is a problem with the Sync Console, you can make it restart by pressing the [ Reboot… ] button. Within several minutes Windows will try to shut down and restart the Sync Console. Normally the Sync Console will be online again in within minutes. If you have given a reboot command, the ‘Reboot Now’ button will be greyed out until the Sync Console has been restarted.
Note: Restarting a console forces it to reboot with no chance to save changes!
Sync Console details
When you click on a sync console, the page showing its details will open. Here you can edit those details, such as when the console should schedule its daily sync, how many docking stations should be connected (so the application knows when something is wrong in that department) and so on. At the very bottom you will find an overview of all the docks and Podcatchers that were found. If there were any errors with a Podcatcher, those slots will be highlighted in red, normal Podcatchers in green, and empty slots are white.
Sync Console history
When viewing a Sync Console’s details, the other tab you’ll find (in the top-left) is History. This screen shows a summary of the syncs that took place this week. For each sync, it’ll show the date, the sync time, and the number of Docks, Podcatchers and errors that were found during the sync.
You can select a week to view and navigate between months using the mini-calendar on the left side of the page.
Tags are a way of labeling stops and to keep track of stops more easily. Tags are saved Site-wide, and can be reused between Tours.
It’s entirely possible to assign multiple Tags to a Stop, which is recommended especially with lots of Stops in a Tour so you can more quickly find the Stops you want to see.
New Tags can be created and assigned to a stop in the tab General of that stop (refer to this page for more information). Labels can be used to group Stops on a wide variety of properties, such as:
Before we start the how-to properly, let’s discuss the steps you should take while making a tour.
First, we need to make sure your Site’s details are correct. This not only helps us greatly whenever we need to assist you, but more importantly also lets visitors know about your contact details so they can actually visit you. These details are shown in the Podcatcher App, MapMyVisit, and on guideid.com.
After that, we can start making the foundation of the audio tour. We’ll create the relevant Stops, fill in their details, and add the Clip flow to them.
Once that’s done, we’ll put the audio script in the Clips and export those scripts for the studio to record.
When the studio sends their audio files back – with the proper file names – we’ll import all of them in one go.
The next step is to add Triggers – in this case, IDentifiers and Start IDentifiers – to the Tour so the Stops can be played.
Finally, we’ll publish everything so the Podcatcher can use the content.
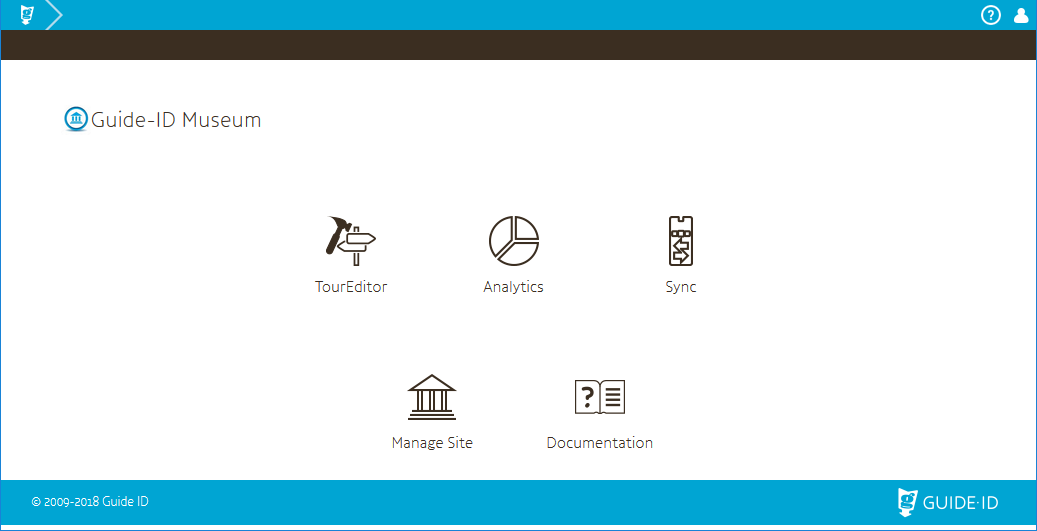
Portal home page
This is the page presented to you when navigating to the Podcatcher Portal when logged in to it. Since we’re building a Tour, click on the TourEditor icon.
Tours, stops, clips at a glance
A site contains audio tours divided and organized in Tours. Tours are often used to distinguish audiences or different audio tours. For example, there could be a Tour for adults and one for children. When a Tour is started, only the IDentifiers linked in that Tour are recognized by a Podcatcher, but an IDentifier can be linked to multiple Tours. For example, the adults’ and children’s’ Tours can have the same IDentifiers, but with different audio for each museum piece.
It’s possible to build multiple Tours for a Site in the TourEditor. A Tour is comprised of a number of ‘Stops’. A Stop is usually an object in the museum, but can also be a room, or an introduction or welcoming message.
A Stop is made up of at least one audio clip (or just Clip). Multiple Clips can be connected in various ways. For example, two Clips can be connected with an automatic transition, so the second Clip starts playing after the first one has finished. Another way is by using A/B/C choice Clips, where visitors press the corresponding button on the Podcatcher to advance to a particular Clip.
Clips contain the language data for all languages in the Tour, both audio and text (which are also used in the Podcatcher App and MapMyVisit). When content of one language is missing, the Podcatcher will attempt to fall back to another language.
Stops are linked to triggers (IDentifiers) so when the corresponding code is received by the Podcatcher, it will start playing the Stop’s first Clip. From there, the Podcatcher will follow the connections until there are no more Clips to play.
To start a Tour, a special IDentifier needs to be activated: a Start IDentifier. There should be one Start IDentifier for each language in the Tour, to start the Tour (and all Clips in it) in that language. The Podcatcher will also let the visitor know which language the Tour was started in, by playing a Clip like ‘U heeft gekozen voor Nederlands’ for Dutch and ‘You have chosen English’ for English.
Some components in the TourEditor can include an image: Sites, Tours, Stops and Clips. As mentioned, these images are used in the Podcatcher App and in our visitor platform MapMyVisit. The Podcatcher doesn’t have the ability to display images.
Components can also include translated texts (such as Stop title and Clip audio script), which are also used in the Podcatcher App and MapMyVisit. The Podcatcher can’t display text (unless you count its label).
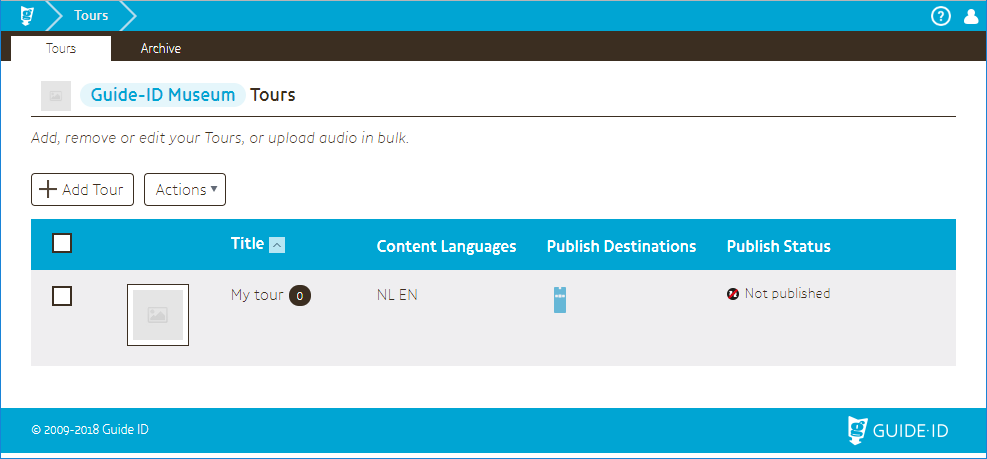
The Tour list
Here you see all your existing audio tours. Somewhat unsurprisingly, this list is empty when starting for the first time. Let’s add a Tour.
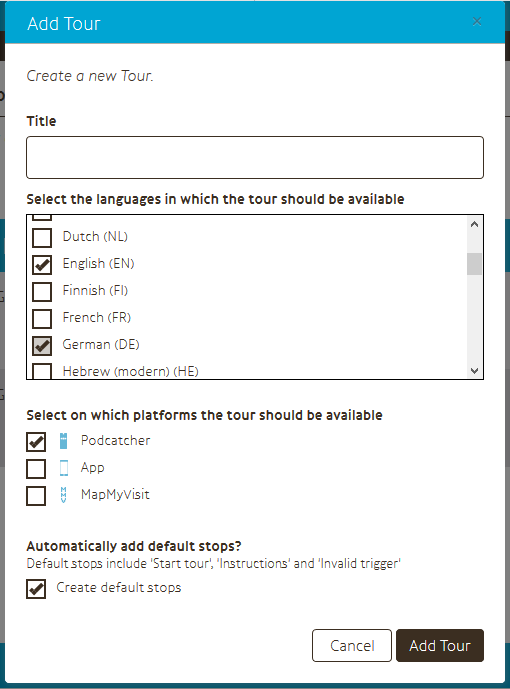
Click [ + Add Tour ] A pop-up screen will appear.
Title: Give it a name that makes sense for yourself and your colleagues.
Content languages used in this tour: Fairly straight-forward. Languages can be added or removed later, in the ‘General’ tab of the Tour.
Platforms: Will this tour be published to the Podcatcher, App, or MapMyVisit? This can be changed afterwards as well, also on the ‘General’ tab of the Tour.
Create default stops: When you check this, some default stops will be created in the tour. These stops can be deleted later on, but they can’t be added automatically afterwards.
After clicking [ Add Tour ], you will see that the list of tours has updated and the one you just made appears.
Now click on the new tour to edit it. The TourEditor shows the (empty) list of stops in the tour.
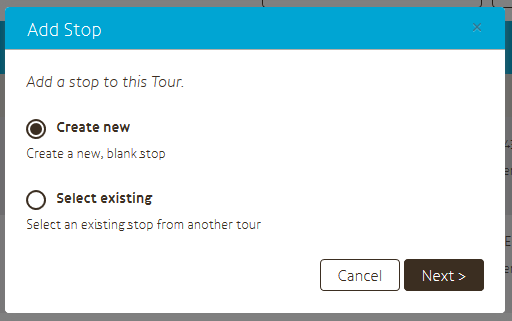
Add Stops
Now that we have a Tour to add content to, let’s add a Stop to add content to.
To create a new stop:
Click the [ Add Stop ] button.
Choose Create new for a new one.
Click the [ Next > ] button.
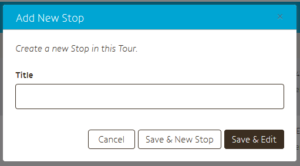
Enter the Stop title and click Save & Edit.
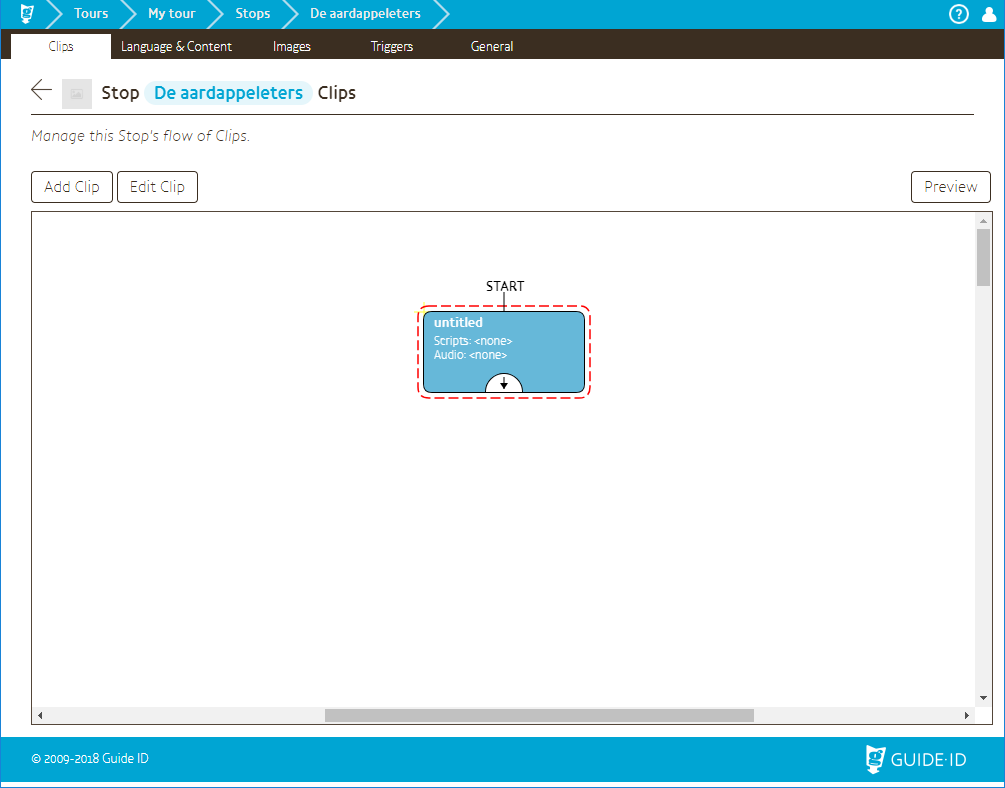
Clip flow editor
After creating the Stop and clicking Save & Edit (or by clicking on its name in the list), this screen appears. Here you can edit the flow of the Clips.
A Stop contains at least 1 Clip. When only one audio fragment has to be presented to the visitor (like in this example), one clip is enough. To edit a clip you can either double-click on it, or use the [ Edit Clip ] button when you have one selected.
To read more about the Clip Editor’s capabilities and functions, please read the related article.
Edit Clip
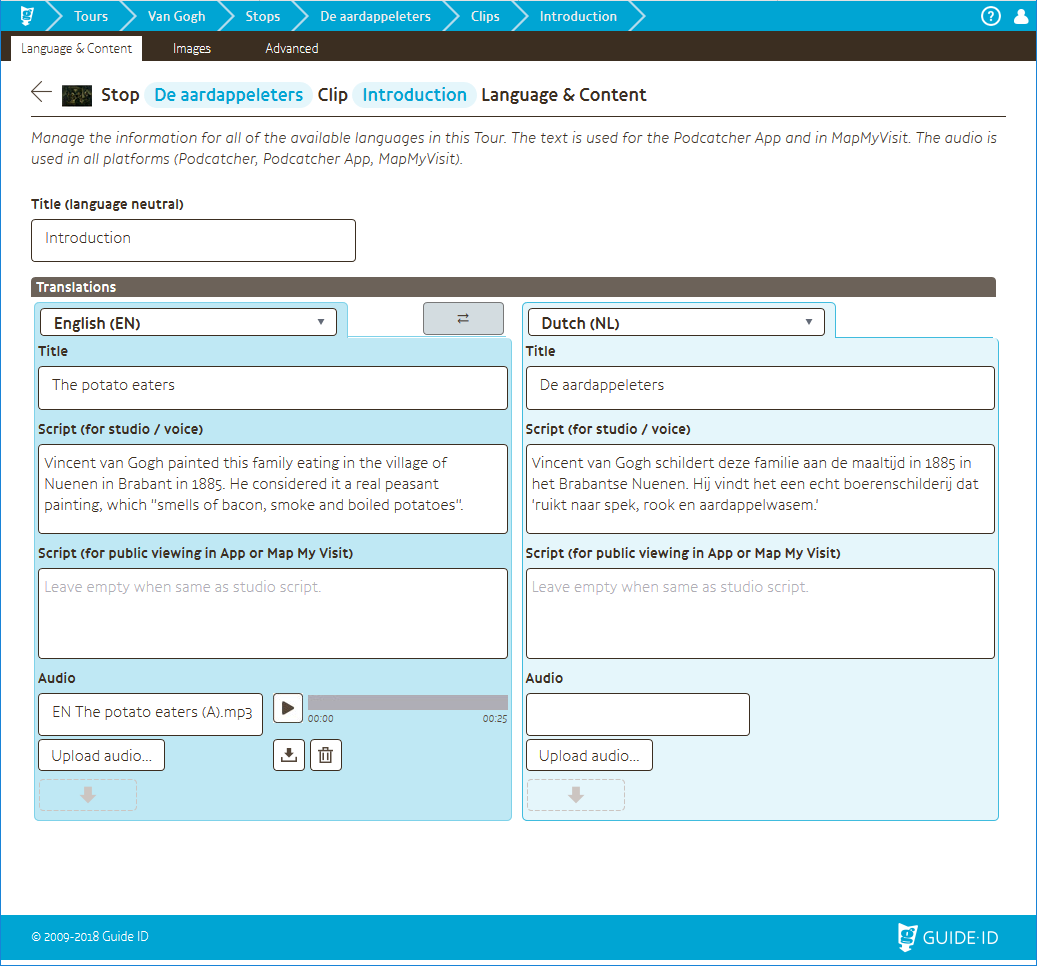
Language & Content
The Language & Content tab is the most important tab for a clip and also the page you see when editing a Clip and upload the audio.
Translations
The page is divided vertically to separate the languages on the left and right. The language either side represents can be changed by using the dropdown menu they’re shown in. Alternatively, to swap the places of the two active languages, you can use the [ ⇄ ] button.
Changing text in one language, then changing which language is displayed does not affect the now-invisible changes you’ve made. If you click the save button in this situation, all of the language data for that page is saved, including the hidden stuff.
Title (language neutral): Edit the title of this clip. Handy in the clip-editor, where it is shown. This title is als used in Analytics, where you can see how your visitors use the audio tour. Title: Translated title of this clip. This is used in the App & MapMyVisit. For Podcatcher-only Tours this can be left blank. If left blank, the language neutral title is used. Script for studio: Script for this clip. This is the text that shows up in the script export that you’ll send to the recording studio. Script for public…: This text is shown in the App & MapMyVisit for this clip. When left empty the main Script is used. If this Stop is for Podcatcher only, this can be left blank. Audio: This holds the audio fragment for this clip in this language.
Audio uploads
To get content on to the Podcatcher, you’ll need to upload it to the Portal first. Uploading is done without you having to wait for it. Once the file is received by the server, it’ll do the legwork in the background. When the processing is done, the file will become available for previewing in the TourEditor and the Podcatcher Portal keeps the original file available for you to download.
Optional; Send scripts to a studio
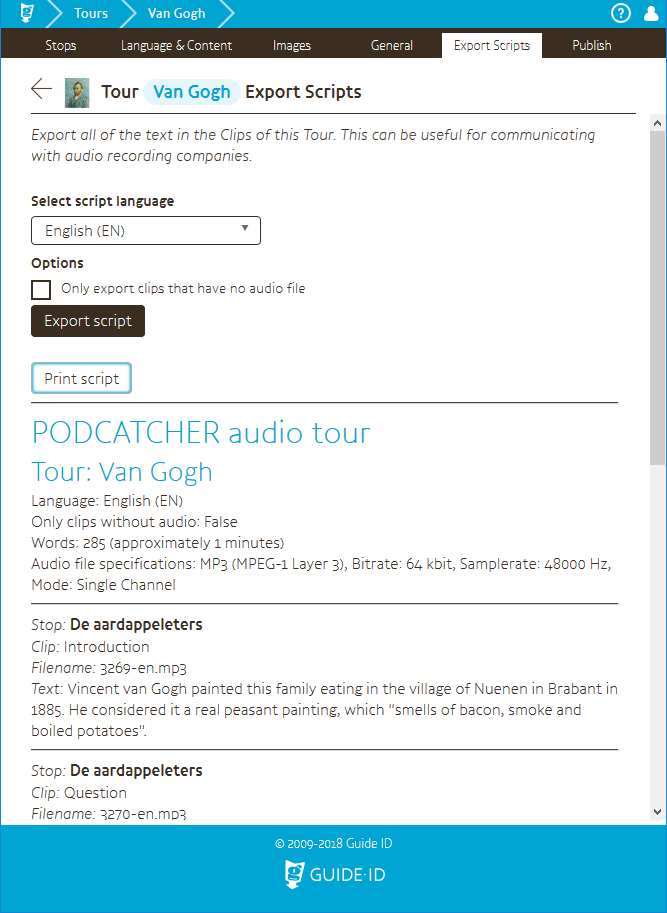
When you’ve built your Tour, added Stops and laid out the Clip flow with all the script texts in place, you can export all of the text from that Tour to send it to a recording studio. You can make an export for each language in a Tour. Go to the Tour, and open the Export Scripts tab.
The first part contains relevant general information about the tour, like what the audio format should be. Below that, every stop and every Clip in it have the script shown. Click the [ Print script ] button to get a printer-friendly version to more easily send it to the relevant parties. If you’d like to save it as a .PDF file rather than printing it out, most browsers support this by selecting “print to file” or similar as a printer.
When the studio uses the mentioned filenames, the audio files can be easily bulk-imported to the correct clip/language.
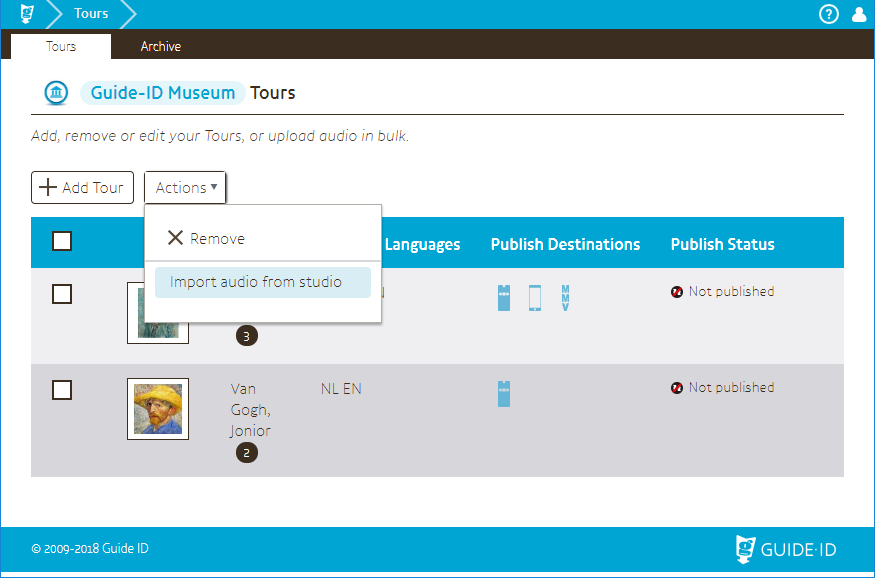
Import audio from studio
From the Tours list, you can click on the Actions button. Doing so reveals a menu with an option to import audio from studio.
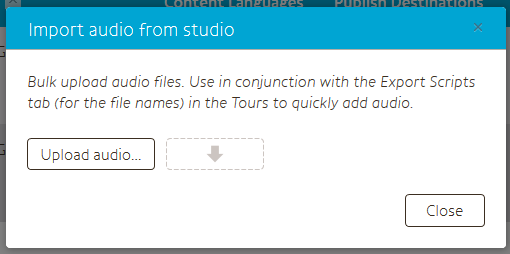
When clicking [ Upload audio ] button, a popup will appear in which you can upload multiple files at a time.
As an alternative, the area to the right of this button is a “drop zone”. Audio-files can be dropped on this area to upload This only works if filenames are used as mentioned in the script export.
Triggers (IDentifiers)
To make the Podcatcher play a stop when the visitor is at a certain location, a Podcatcher needs to receive a ‘trigger’ (start signal) to know which audio file to play. The most common trigger is an IDentifier fixed near an artwork. In the TourEditor you have to assign the trigger’s code to that Stop, so the Podcatcher knows to play the relevant audio when it receives that code. IDentifiers are shipped with a built-in code, which is transmitted (via infrared) to the Podcatchers. Therefore, most triggers can’t be assigned until you receive the IDentifiers (as their codes are shown on a sticker on the back of the devices).
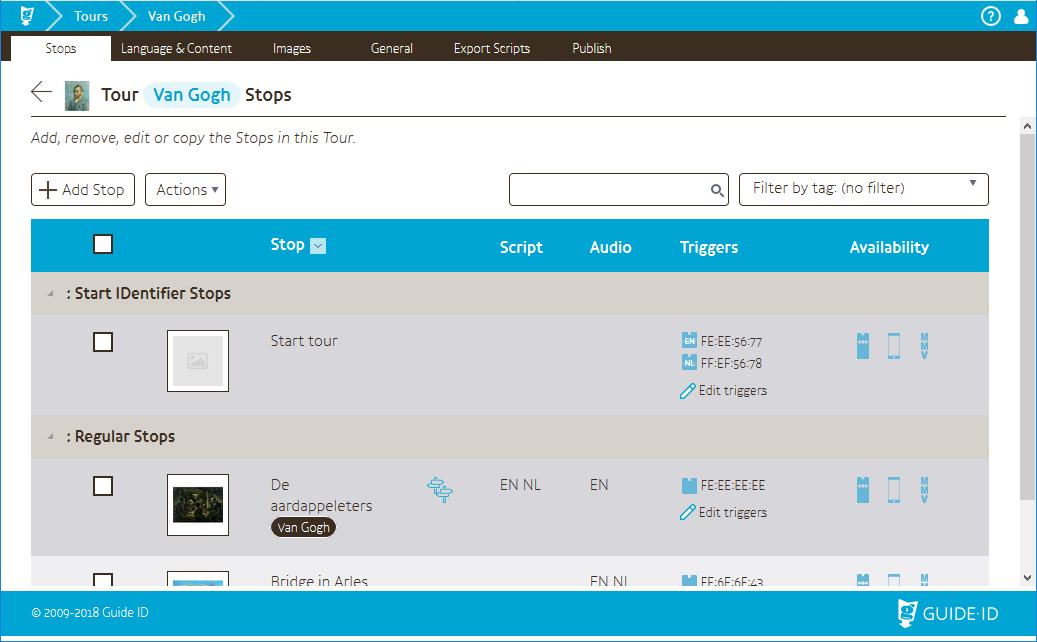
Assign Triggers to stops
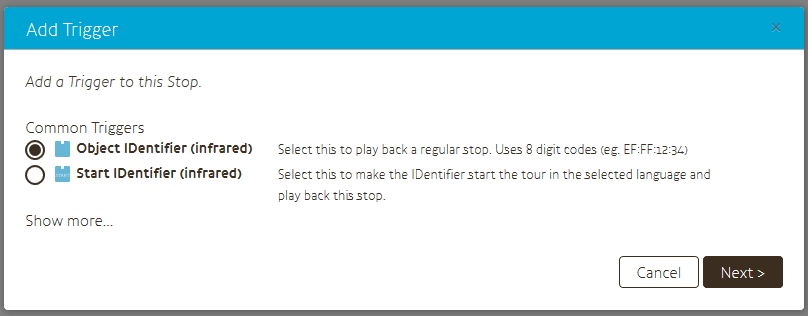
All Stops that have to be used for the Podcatcher need to have a trigger assigned, or they won’t be accessible. To add a trigger go to the Triggers tab of the stop (or click [ Edit triggers ] in the stop list). Click the [ Add ] button to add a trigger.
The most common triggers are:
Object IDentifiers. These are the IDentifiers that you place near an artwork, at the entrance of a room, and so on.
Start IDentifiers. This is an IDentifier that we use to start the audio tour in a language. Therefore, every tour needs at least one Start IDentifier for every language. Read more about Start IDentifiers here.
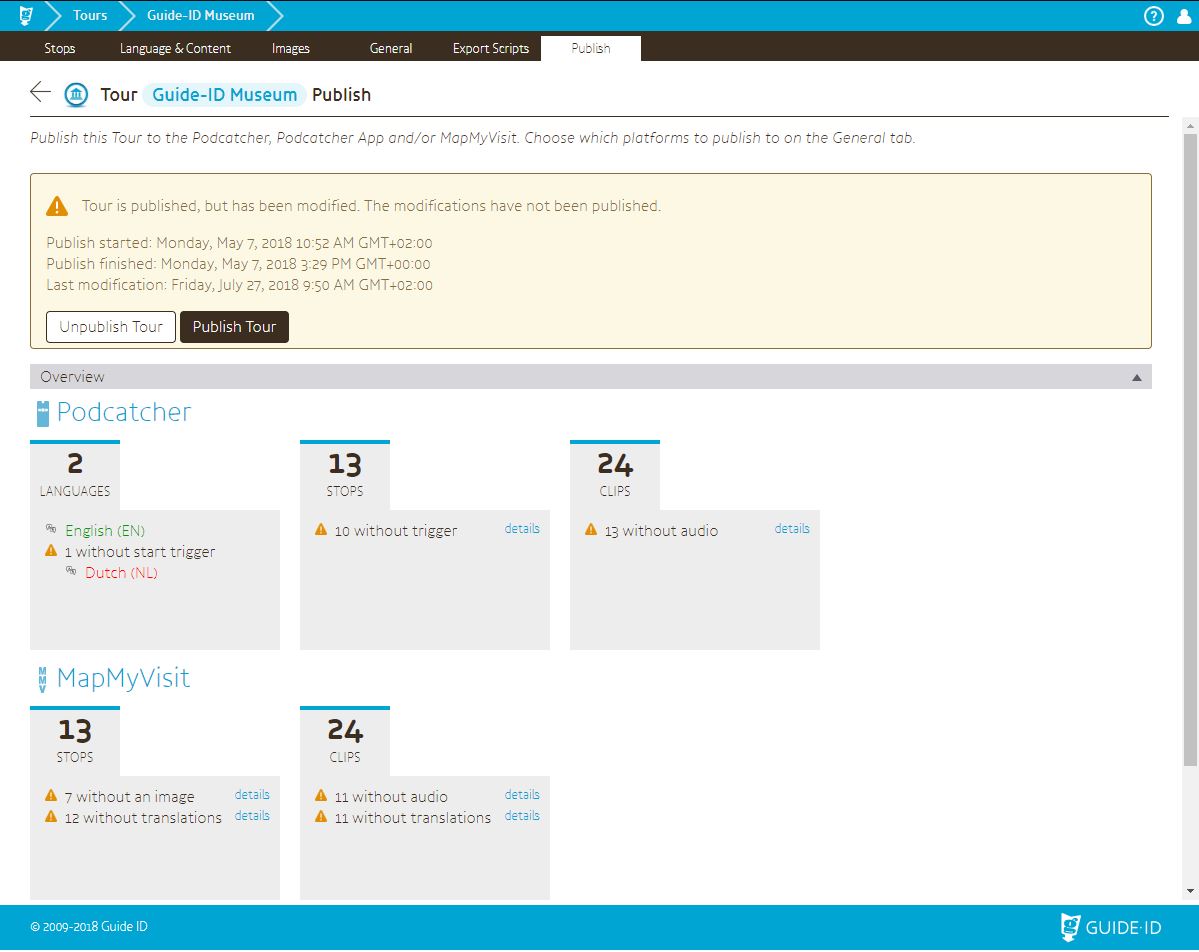
Publish tour
Publishing means the Tour’s content is made available to the Podcatcher (and/or the Podcatcher App and/or MapMyVisit). After publishing, the next time the Podcatchers are synchronized, they will be updated with the content. Multiple Tours can be available on a Podcatcher, so you can have both a regular Tour as well as a children’s Tour in the same language.
How to publish the data
For the Tour you want to publish, go to Publish tab (or click on the publish status column in the Tour list to get there).
At the top of the page you’ll find a summary of what will and what will not be published to the available publish destinations (Podcatcher, Podcatcher App, MapMyVisit). If it says any content is missing, this doesn’t mean the Tour won’t be accessible, just that the content is missing and it won’t be available. Clicking on any of the messages will show you which Stops/Clips are missing things, with convenient links to the page to fix it. However, in the end it’s all up to your judgement: these are just messages to help make the Tour the best it can be.
When you click on the [ Publish Tour], the Tour will be prepared to be made available to the relevant publish destinations.
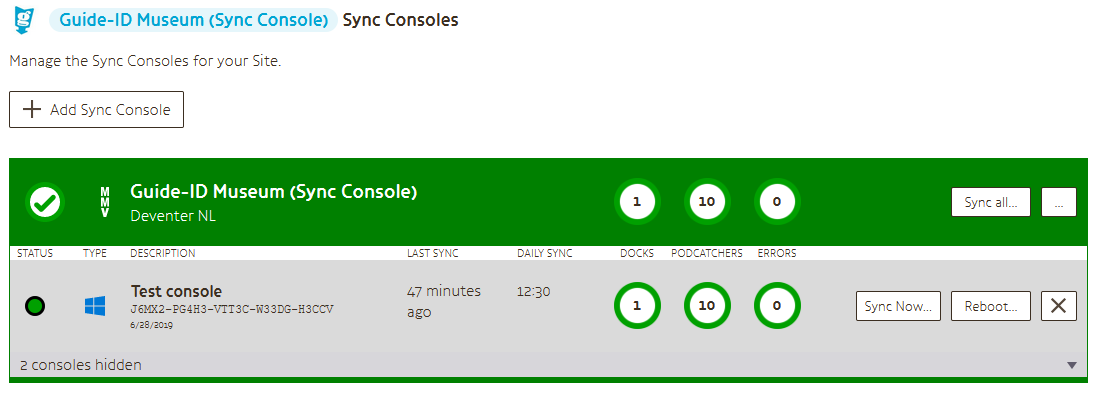
Synchronize your content
To synchronize the new content to your Podcatchers, a PC needs to be set up as a “Sync Console” near/at the handout desk which is connected to the Dockingstations and Internet. Depending on your contract we provide this PC to you or you can install your own PC. When the Sync console has been set up and all the hardware has been connected, the daily automatic sync will check your Podcatchers and will add the newly published Tour onto the Podcatchers. If you don’t want to wait until the automatic sync kicks in, you can start a manual sync by clicking on the Sync button in the sidebar.
Here you can see all your Sync Consoles, with some information on what happened during the last sync, as well as when the server last received status updates, and so on. Click on the [ Sync now ] button to, you guessed it, make the Sync Console retrieve the data from the servers and distribute it to the Podcatchers.
Test your tour
When the Sync has finished and all the Podcatchers are lit green, they are ready to use. Take a Podcatcher from a sync console, activate it with the appointed start IDentifier and test if all works as required.
If it does not work, you can check the Podcatcher sync errors page or go back to the homepage and have a look at the Frequently Asked Questions.
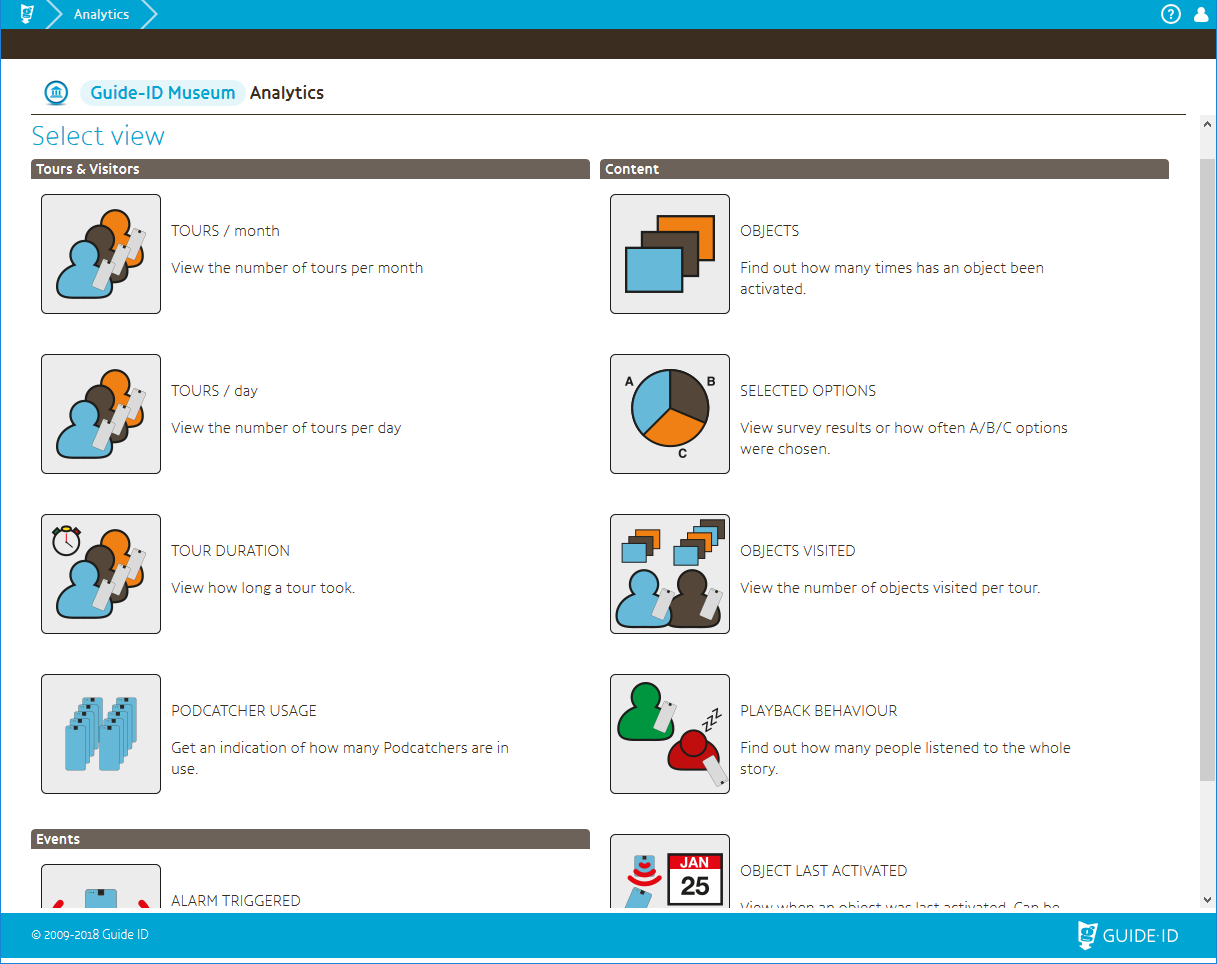
As the name implies, Analytics is the place where you can analyze your Site’s data – as far as we have the data for it, anyway. We use the Podcatchers’ log files to calculate a number of things.
Tours & Visitors; Here you’ll find the pages for viewing how many Tours were done in your Site, how long visitors took to do the Tour, and how many Podcatchers were in use over time.
Events & System; This category is for general events and the system hardware. It contains the graph for how many times the alarm was triggered on Podcatchers (read more on how to set this up if you haven’t already, here) and a IDentifier battery status sheet.
Content; This category contains statistics on your content, like how many times a Stop was triggered, which options were chosen in choice Clip flows, and so on.
The Podcatcher Portal allows you to manage your audio tours in-depth, see how your visitors use them, synchronize your Podcatchers remotely, and so on. If you’re working with the Portal and ever feel lost, remember that the help icon () at the top-right will open up the documentation for that page.
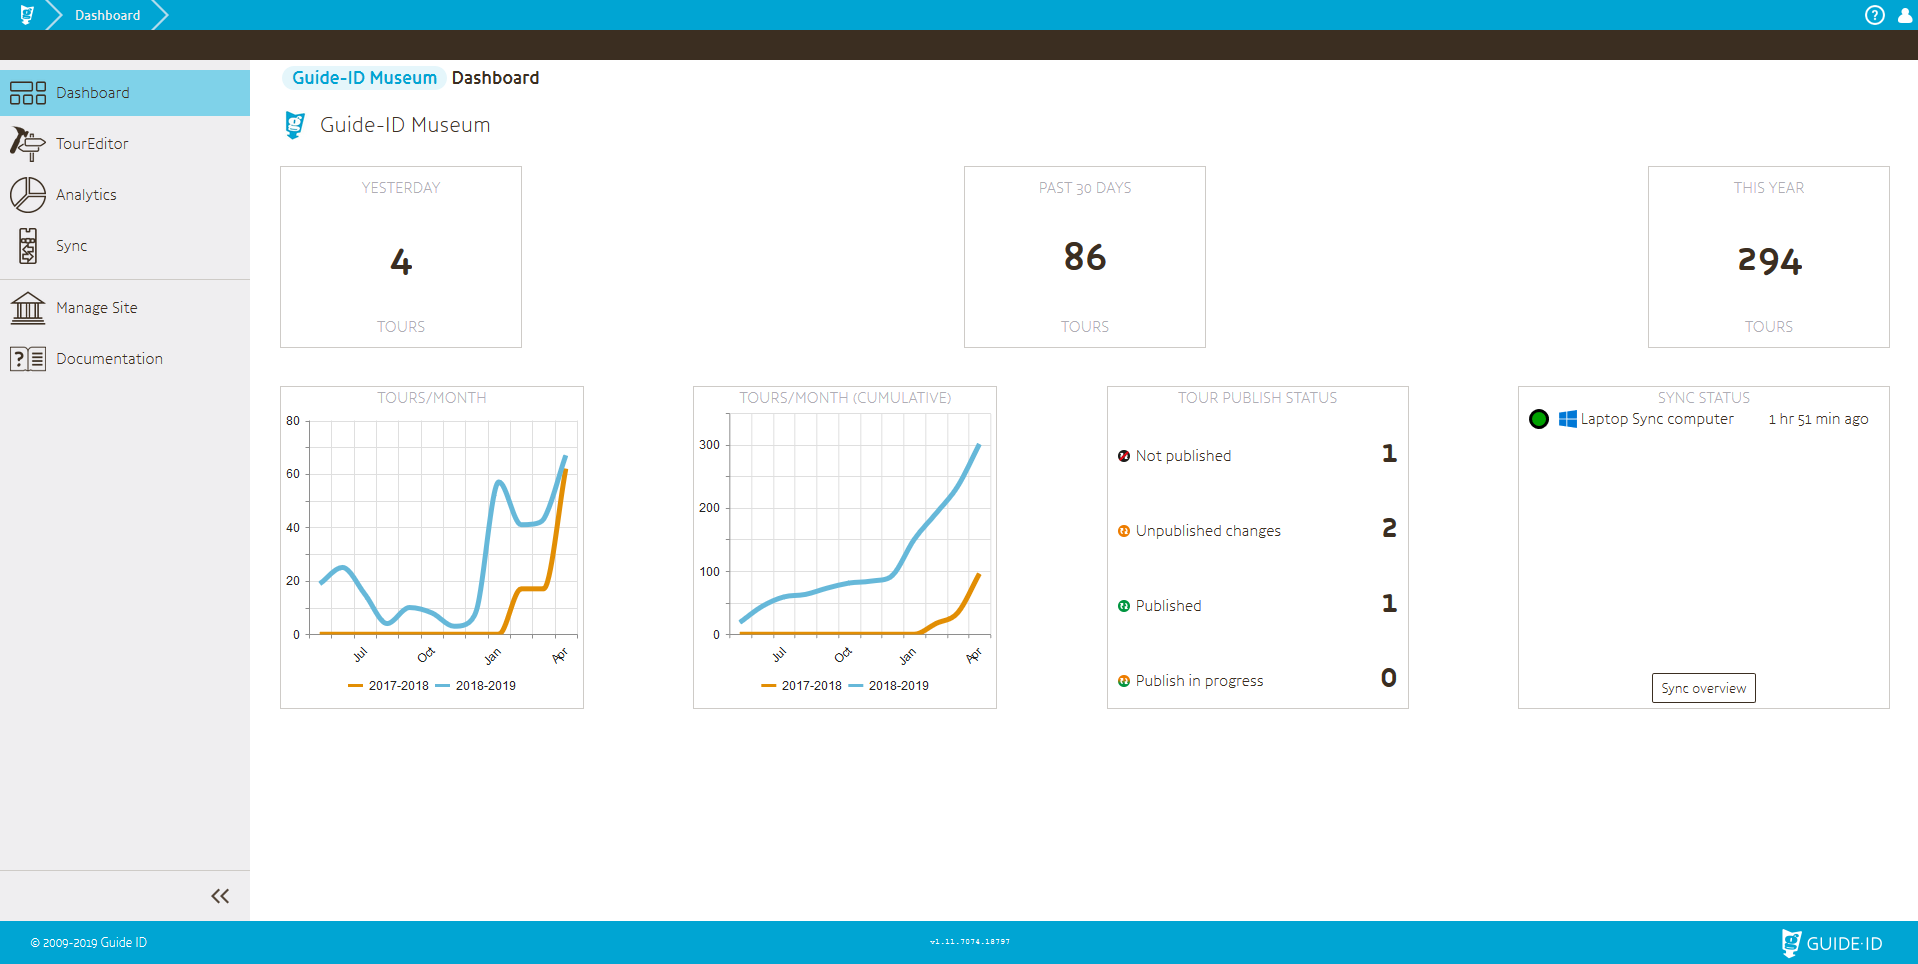
After you’ve logged in, you will be presented with the home page of the Podcatcher Portal. Here you can see at-a-glance how your site is doing.
The dashboard contains a summary of how many visitors your site has had in the past day, month and this year in the numbers. Further, the graphs represent how many visitors experienced a tour compared to last year. The ‘Tour publish status’ table shows how many tours may need publishing, to make sure Podcatchers are guaranteed to have all the latest content. Lastly, the ‘Sync status’ is a summary of what your Sync Consoles are up to.
On the left-hand side throughout the Portal, the sidebar allows quick navigation through the different parts of the application:
TourEditor: Create, update, and manage your audio tours and their content. Analytics: Analyze the data the Podcatchers have sent back as part of their synchronization. Sync: Schedule synchronization moments, review sync status reports, and manage sync console settings. Manage Site: Manage your Site’s information, such as contact details and who is allowed to change or view things in the other parts of the Portal. Documentation: Refers to this knowledgebase.
Should an icon be greyed out for you, this means it’s not been made available to you by your Site administrator. Contact them if you think this is in error.
You can collapse (or expand) the sidebar at any time by clicking the ‘<<‘ button at the bottom of it.
Introduction to the screen layout
The Podcatcher Portal has its layout built so that it’s consistent across the website. Here we’ll explain what the most important features are and how we recommend you use them.
Breadcrumbs
At the very top of every page is a strip of blue background with white arrows, text, and a few icons at the very end.
The Guide ID logo always takes you back to the home screen if you click on it.
The bit of the bar to the right of the logo – which is called the “breadcrumb trail” – represents the trail or path you can take to go back to the start of the application.
At the very right there are two more icons: click the question mark to open the Help popup (which opens this knowledgebase’s relevant article for that page), and the pawn icon to show the Account popup where you can change your account details or password, and log out of the Portal.
Tabs
Just below the breadcrumb trail are the Tabs. These buttons shows you which part you’re editing. For example, Sites have a General Tab, a Language & Content Tab, an Images Tab, a Tab for the Podcatcher settings, and lastly a Tab to manage the users on the Site. Each Tab has different things to add, edit or view. If you’re ever unsure about what the current Tab is for, simply click the question mark icon in the top-right of the page.
Page title
Below the Tabs is a concise indication of where in the application you’re working. The arrow on the left will take you ‘up’ one ‘level’; from a Stop to the Stop list in that Tour and so on.
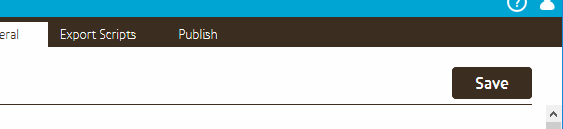
Saving changes
Whenever you change something in a form, the [ Save ] button will pop up at the top right of the screen. Clicking it will save the changes to the server.