Basic
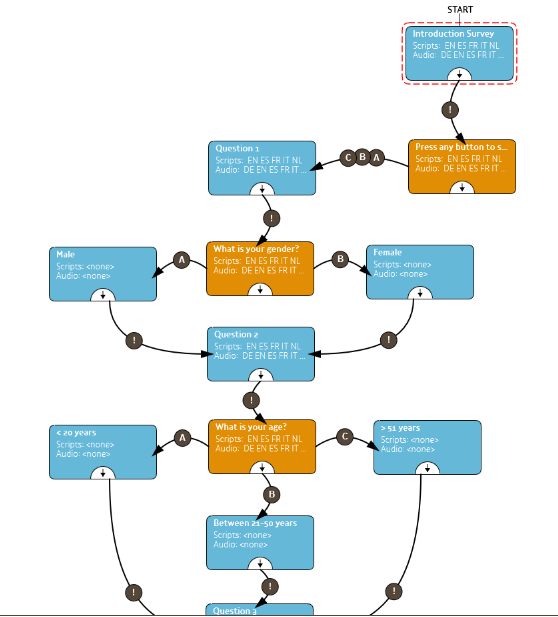
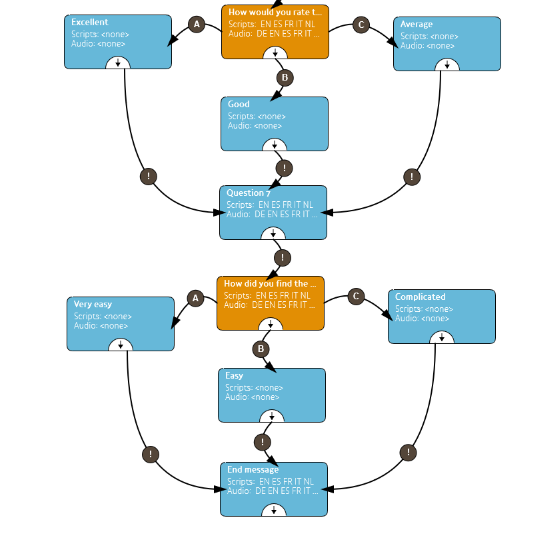
You can add layers in a Stop to provide extra information to your visitor (for example; “if you’d like to know more about the painter press A, if you would like to know more about his style of painting press B etc). But you can also use the layers if you would like to add a quiz question in a Stop. You can achieve this by adding A/B/C options in your Clip flow for that specific stop.
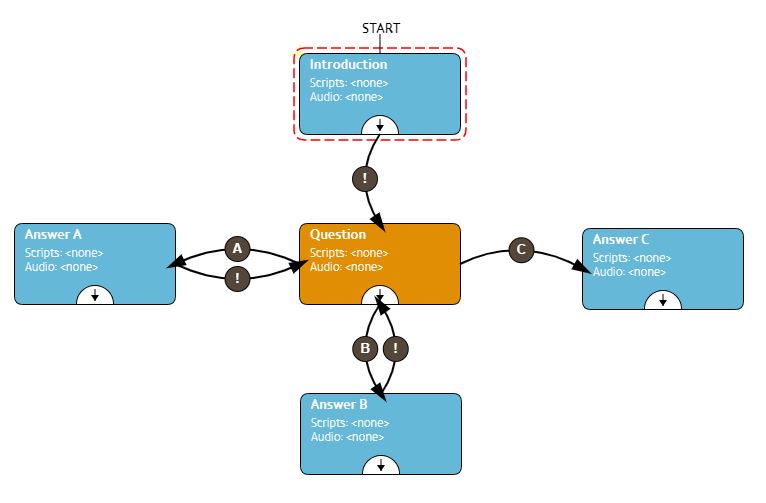
Note; If you would like to use such a flow, we recommend starting out with an introductory Clip, which connects with an ‘Auto continue’ to the actual question clip, which then connects to the possible choice clips A, B, and/or C. You need to use this flow so the visitor can still adjust the volume on the Podcatcher or use the pause/ playback button, while the audio is playing but no question is yet being asked.
The example below shows a A/B/C flow used for a quiz Stop. When the Stop is triggered, the introduction will play first, explaining what this Stop is about. It would have content like “The Podcatcher is an amazing device. It was made by ….”. When the introduction Clip’s content finishes, the question will be posed (yellow clip) for example “The first Podcatcher was built in which country? Press the ‘A’ button for the United States of America, ‘B’ for Japan, or ‘C’ for the Netherlands”. When option A is chosen, the ‘Option A’ clip would play “That is not correct. The Americans did not build the first Podcatcher.” and a similar Clip for option B. Both of them would ask the question again, since they have an ‘Auto continue’ connection back to the question Clip. Option C would yield “That’s correct! The first Podcatcher was built in the Netherlands in the early 2000s.”. The flow then ends, as there are no more connections to follow.
 Adding a quiz Stop to your “standard” tour can be a fun addition to the content, but it is also a great way for setting up a kids tour. Imagine all the fun questions, extra information or sounds you can add to make a cool tour especially for children. You could take them on a treasure hunt where they get clues by selecting the right answer to a question, or when choosing an A/B or C option. The sky is the limit, it only takes some extra effort and imagination.
Would you like to add a kids tour for the children visiting your museum?
It is very easy to add a kids tour at your museum while making use of the same IDentifiers which are already in place at the museum in your standard tour. To do so, you have to add a new tour > copy the Stops from the standard tour to your new tour (don’t forget to select the triggers to be copied as well) Note; do not use “add existing” when adding the new stops but make sure to copy them! > then alter the Stops in the new tour with the new content. You can even add or remove clips, that is no problem. You will only need to add a separate Start IDentifier for this new tour.
If you would like the adults to be able to listen to the content of the kids tour as well, or vice versa, you will need to place 2 IDentifiers with each object in the museum, one to trigger the adult (standard) content and one to trigger the kids content. In that case you can add the new kids Stops to your standard tour and do not need to add extra Start IDentifiers.
Note; if the kids tour (or Stops) is (are) not available in the same languages as the standard tour, you need to set the fallback for the other languages
Would you like to add points to collect to your kids tour Stops?
Quiz question stops are often used in a kids tour, because they can add a lot of fun to the tour. To make it even more interesting for (older) kids, you can also add points to the right answer in a Stop for the kids to collect! The Podcatcher keeps track of the points collected.
Before you can start adding the points in the stops, you have to think about how many questions you have, how many points you would like to add to the right answer and what the score possibilities are. Then you have to decide how you would like the kids to know how many points they have scored. There are two possibilities;
1. You can either choose to let the kids know exactly how many points they have scored.
2. Or you can set up different categories and, depending on the amount of points they collected, assign them to a specific category (for instance gold, silver, and bronze)
So here is an example; you have 10 questions, for each right answer they get 5 points. That will give you the following possibilities;
0 points – no right answers were given
5 points – 1 right answer was given
10 points – 2 right answers were given
15 points – 3 right answers were given
… etc …
50 points – all 10 answers were right
Note; only the first given answer will count for points. So if they choose the wrong answer, go back to the question and the choose the right answer, these points do not count.
If you want to let the kids to know their score using the 1st possibility, you will need to record 11 audio files for the pronunciation of the scores; 0 points, 5 points, 10 points… etc… 40 points, 45 points and 50 points
Using the 2nd possibility (categories) you will have to divide the points into the number of categories. For example;
0-15 points – Bronze
20-35 points – Silver
40-50 points – Gold
You will then only have to record 3 audio files. (Example gold; “wow you are an expert! you have earned a golden medaillon” or silver; “you didn’t have all the questions right, but you have earned a silver medaillon!” etc. This also allows you to really handout something special for instance a gold, silver, or bronze medallion / star.
Adding points to the “right” clip in a Stop
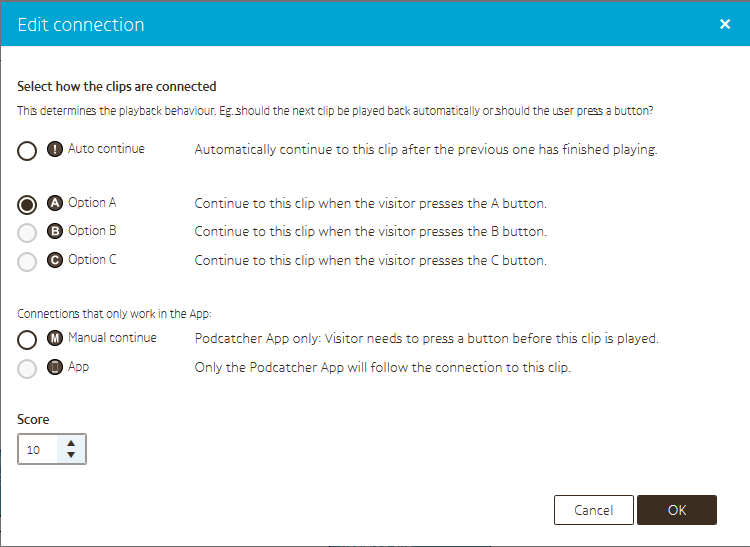
When you select A/B or C you can immediately add the points in the field Score. Note; your site has to be set to this mode by Guide ID. If you cannot add a Score in the screen please contact us at helpdesk@guideid.com and we can implement this setting on for you.
But how can the kids read out their score?
You can let the kids know their score during the tour and of course their final score at the end of the tour. The way to do this is by adding a special Score clip in a stop. This can be added in a stop which also contains a question, or an stop specially added for reading out the score. You can even add an instruction for instance “press A to hear your score so far”. The only limitation is you cannot add another clip after the score clip
To add a Score clip select “add a clip” in the Clip editor and choose Score.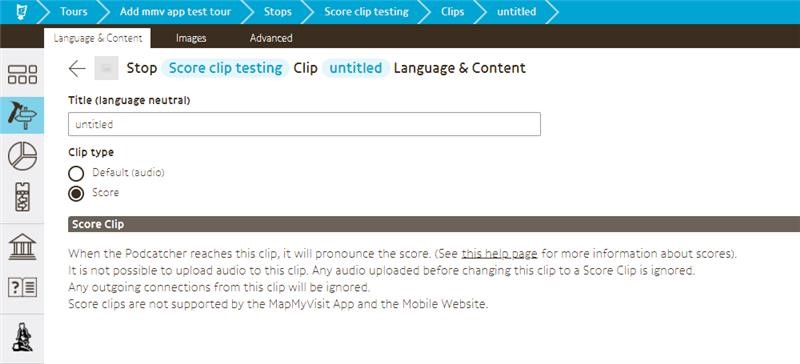
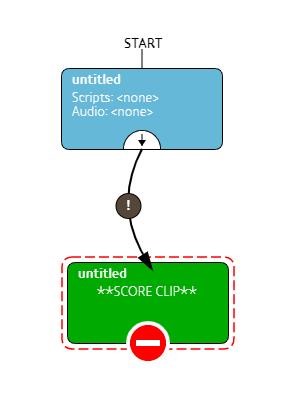
In the clip flow you will then see the green clip added. As soon as the audio from the clip above has been played it automatically goes to the Score clip, and this activates the action on the Podctacher to run the logs to read out the collected points and then play the right audio which pronounces the score.
Note; This whole setup is different then the old way where you had to use a special Score IDentifier to read out the scores. These are not being produced anymore. So if you use(d) this in the museum for a tour, you will have to make some adjustments to the tour!
Adding audio stops for the pronunciation of the scores
To be able to playback an audio file which tell you the score (when pointing at a Score IDentifier) you need to record and add these to your tour, just as any other Stop. So in the example above, if you chose to pronounce the exact score you will need to add 11 Stops in your tour or when using categories, 3 Stops.
The next step is to add triggers to these score Stops (not actual IDentifiers but score pronunciation triggers) which can be found when you select “show more” when adding a trigger. Note; you can only choose these triggers if your site has been set to this mode by Guide ID. So if you cannot select them contact us at helpdesk@guideid.com and we implement this setting on for you.
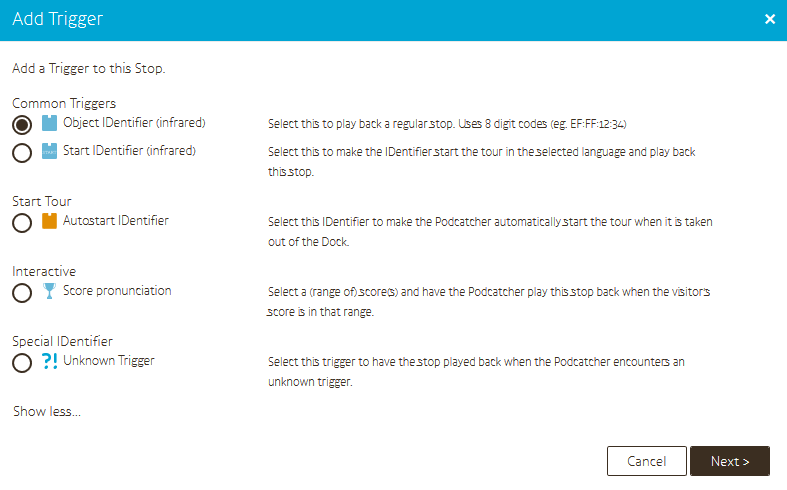
When you have selected Score pronunciation, a new screen will pop up in which you can add the score;
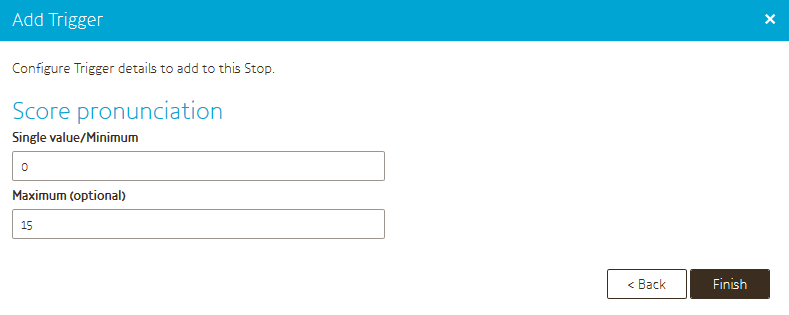
When using exact scores you only need to fill in the actual score for that stop in the field Single value / Minimum.
If you use categories you enter the lowest points of that range in the field Single value / Minimum and the highest points of that range in the field Maximum.
When you press finish the triggers will be added to your stop. For a single score stop it will show one trigger, for a category it will show all the triggers in that range.
