What are the payment methods?

Bank transfer


Update October 2023:

Guide-ID B.V support the following payment methods:

Europe (accepting EUR and GBP)
Guide-ID B.V. has a bank account with Rabobank
IBAN (account number): NL27 RABO 0119642182
SWIFT (BIC): RABONL2U
Please quote reference: Invoice number xxxxxx (see invoice for details)

United States (dollars)
Guide-ID B.V. has a bank account with WISE
Account number: 8311264538
Routing Number (ACH or ABA): 026073150
Wire routing Number: 026073150
Bank code (SWIFT/BIC): CMFGUS33

Address: 30 W. 26th Street, Sixth Floor New York NY 10010
Please quote reference: Invoice number xxxxxx (see invoice for details)

Check payments
PLEASE NOTE: Check payment are NOT accepted and will not be processed.

If you have any additional questions, please send an email to:
billing@guide-id.com

How to contact our customer support department?

Our customer support department can be reached by telephone or email from Monday through Friday from 08.30 o’clock in the morning until 17.00 o’clock in the afternoon (CET, Amsterdam)

Telephone number:  +31 (0)570-572202 (option 1 support)
Email:                           helpdesk@guideid.com

If we cannot be reached by telephone, during opening hours, your call will be forwarded to our telephone service. Your message will then be passed on to our employees to follow up.

Your email will be read during our opening hours and responded to, accordingly within three days. If we cannot be reached by email, you will receive an out of office message with instructions. 

In case of emergencies during the weekend, you can reach us via WhatsApp on +31638072466  from 08.30 o’clock in the morning until 17.00 o’clock in the afternoon (CET, Amsterdam). We will response to your emergency within 3 hours.

(An emergency would be out-of-use Podcatchers so visitors cannot use the audio tour. Or when the Podcatcher Portal is not available).

In case you are not happy with a moment of contact with us, please let us know. You can contact our helpdesk or if this doesn’t feel right, contact the Business Managers.

How to add a survey (enquête) to your tour?

Guide ID can provide a standard survey which you can add to your tour.
It is one Stop and contains the following content;


Standard survey content

Thank you very much for visiting. We would greatly appreciate it if you would take a few moments to answer a few simple questions. This will take no longer than 2 minutes.

Press any button to start

1. What is your gender?
Press A for male
Press B for female

2. What is your age?
Press A for 20 years or younger
Press B for between 21 and 50 years
PresC for 51 year or older

3. How far did you travel to visit the museum?
Press A for less than 20 kilometers
Press B for between 20 and 75 kilometer
Press c for more than 75 kilometer

4. How did you become aware of this exhibition?
Press A for via the internet
Press B from family, friends or acquaintances
Press C for other media

5. How would you rate the exhibition?
Press A for excellent
Press B for good
Press C for average

6. How would you rate the content of this audio tour?
Press A for excellent
Press B for good
Press C for average

7. How did you find the use of the handset during the tour?
Press A for very easy
Press B for easy
Press C for complicated

Thank you for you participation. Your feedback is very much appreciated and will be used to improve our visitor services. We hope to see you again soon!


The standard survey is available in 6 languages; Dutch, English, German, French, Spanish and Italian.

If you would like to implement it in your tour you can contact us at helpdesk@guideid.com and let us know. We will then send out an IDentifier (with a survey label) for you to connect to this new stop. Or you can connect a spare IDentifier you already have. 

Once the survey is in use at your museum, you can view the visitor answers in your Analytics using the “selected options”

Adding your own Survey

Like any other Stop, you can also create your own survey and add any question and answer possibilitie you wish. You can build the right structure in a Stop using the Clip flow editor. (Click here for more information about adding and editing clips in a Stop). Tip; make sure you do not add more then 7 questions (preferably 5) because we know from experience that visitors don’t have the patience to answer the whole survey when asked more questions. 

The right structure for a survey in your Stop should be;

As you can see in the picture above, it’s important to separate the question (blue clip) and the answer possibilities (orange clip) in two separate clips in order to keep the functionality of the volume and pause/play buttons available when the question is being played. Also always add a short description of the question in the clip title that plays the answer possibilities (example; what is your gender?) and in the clip title of the A/B/C choice clips (example; A = male)

At the end of the survey you can connect the last A/B/C clips to an end message.

How to make a quiz or add a kids tour

Basic

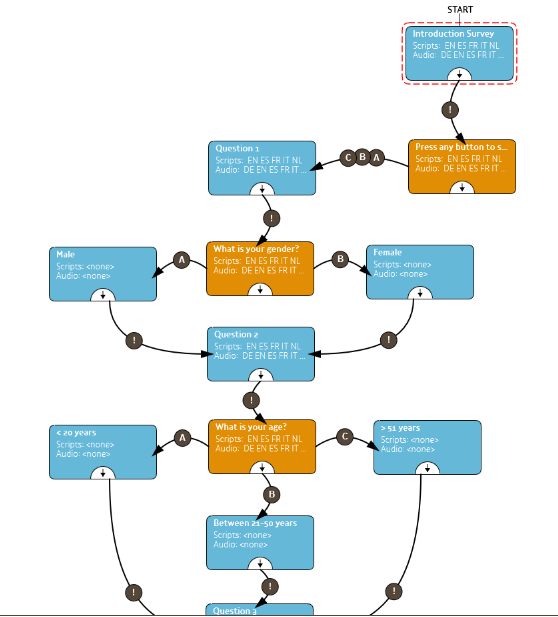
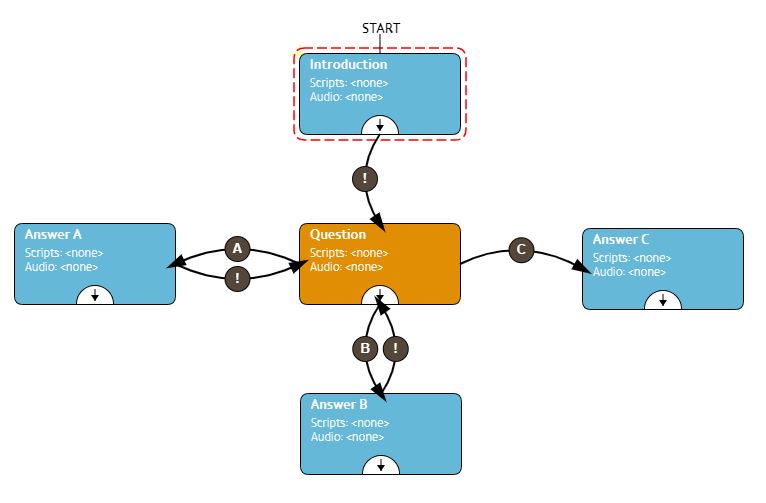
You can add layers in a Stop to provide extra information to your visitor (for example;  “if you’d like to know more about the painter press A, if you would like to know more about his style of painting press B etc). But you can also use the layers if you would like to add a quiz question in a Stop. You can achieve this by adding A/B/C options in your Clip flow for that specific stop.

Note; If you would like to use such a flow, we recommend starting out with an introductory Clip, which connects with an ‘Auto continue’ to the actual question clip, which then connects to the possible choice clips A, B, and/or C. You need to use this flow so the visitor can still adjust the volume on the Podcatcher or use the pause/ playback button, while the audio is playing but no question is yet being asked.

The example below shows a A/B/C flow used for a quiz Stop. When the Stop is triggered, the introduction will play first, explaining what this Stop is about. It would have content like “The Podcatcher is an amazing device. It was made by ….”. When the introduction Clip’s content finishes, the question will be posed (yellow clip) for example “The first Podcatcher was built in which country? Press the ‘A’ button for the United States of America, ‘B’ for Japan, or ‘C’ for the Netherlands”. When option A is chosen, the ‘Option A’ clip would play “That is not correct. The Americans did not build the first Podcatcher.” and a similar Clip for option B. Both of them would ask the question again, since they have an ‘Auto continue’ connection back to the question Clip. Option C would yield “That’s correct! The first Podcatcher was built in the Netherlands in the early 2000s.”. The flow then ends, as there are no more connections to follow.

Adding a quiz Stop to your “standard” tour can be a fun addition to the content, but it is also a great way for setting up a kids tour. Imagine all the fun questions, extra information or sounds you can add to make a cool tour especially for children. You could take them on a treasure hunt where they get clues by selecting the right answer to a question, or when choosing an A/B or C option.  The sky is the limit, it only takes some extra effort and imagination.

Would you like to add a kids tour for the children visiting your museum?

It is very easy to add a kids tour at your museum while making use of the same IDentifiers which are already in place at the museum in your standard tour. To do so, you have to add a new tour > copy the Stops from the standard tour to your new tour (don’t forget to select the triggers to be copied as well) Note; do not use “add existing” when adding the new stops but make sure to copy them! > then alter the Stops in the new tour with the new content. You can even add or remove clips, that is no problem. You will only need to add a separate Start IDentifier for this new tour.

If you would like the adults to be able to listen to the content of the kids tour as well, or vice versa, you will need to place 2 IDentifiers with each object in the museum, one to trigger the adult (standard) content and one to trigger the kids content. In that case you can add the new kids Stops to your standard tour and do not need to add extra Start IDentifiers.

Note; if the kids tour (or Stops) is (are) not available in the same languages as the standard tour, you need to set the fallback for the other languages

Would you like to add points to collect to your kids tour Stops?

Quiz question stops are often used in a kids tour, because they can add a lot of fun to the tour. To make it even more interesting for (older) kids, you can also add points to the right answer in a Stop for the kids to collect! The Podcatcher keeps track of the points collected.

Before you can start adding the points in the stops, you have to think about how many questions you have, how many points you would like to add to the right answer and what the score possibilities are. Then you have to decide how you would like the kids to know how many points they have scored. There are two possibilities; 

1. You can either choose to let the kids know exactly how many points they have scored.
2. Or you can set up different categories and, depending on the amount of points they collected, assign them to a specific category (for instance gold, silver, and bronze)

So here is an example; you have 10 questions,  for each right answer they get 5 points. That will give you the following possibilities;

 0  points – no right answers were given
 5  points – 1 right answer was given
10 points – 2 right answers were given
15 points – 3 right answers were given
… etc …
50 points – all 10 answers were right

Note; only the first given answer will count for points. So if they choose the wrong answer, go back to the question and the choose the right answer, these points do not count.

If you want to let the kids to know their score using the 1st possibility, you will need to record 11 audio files for the pronunciation of the scores; 0 points, 5 points, 10 points… etc… 40 points, 45 points and 50 points

Using the 2nd possibility (categories) you will have to divide the points into the number of categories. For example;

 0-15  points – Bronze
20-35 points – Silver
40-50 points – Gold

You will then only have to record 3 audio files. (Example gold;  “wow you are an expert! you have earned a golden medaillon” or silver; “you didn’t have all the questions right, but you have earned a silver medaillon!” etc.  This also allows you to really handout something special for instance a gold, silver, or bronze medallion / star.

Adding points to the “right” clip in a Stop

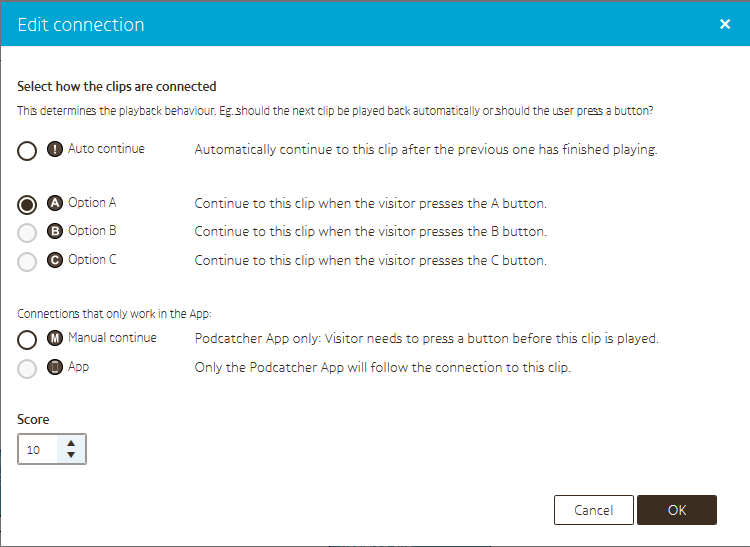
When you select A/B or C you can immediately add the points in the field Score. Note; your site has to be set to this mode by Guide ID. If you cannot add a Score in the screen please contact us at helpdesk@guideid.com and we can implement this setting on for you.

But how can the kids read out their score?

You can let the kids know their score during the tour and of course their final score at the end of the tour.  The way to do this is by adding a special Score clip in a stop. This can be added in a stop which also contains a question, or an stop specially added for reading out the score. You can even add an instruction for instance “press A to hear your score so far”.  The only limitation is you cannot add another clip after the score clip

To add a Score clip select “add a clip” in the Clip editor and choose Score.


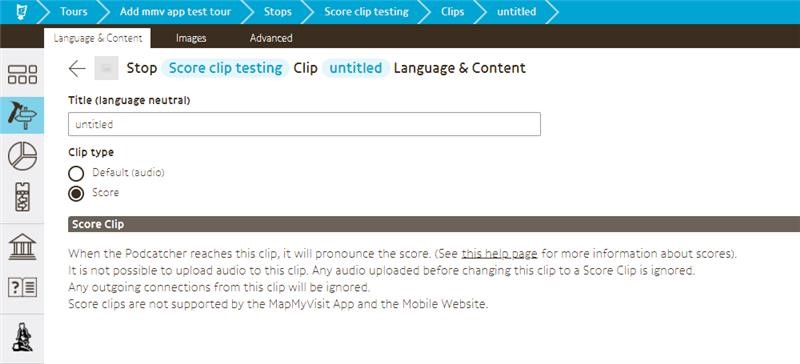
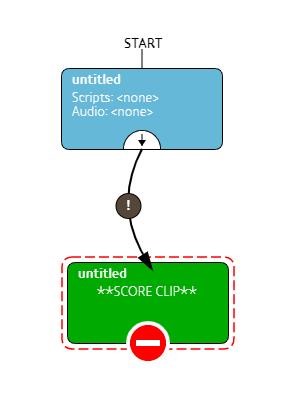
In the clip flow you will then see the green clip added. As soon as the audio from the clip above has been played it automatically goes to the Score clip, and this activates the action on the Podctacher to run the logs to read out the collected points and then play the right audio which pronounces the score.

Note; This whole setup is different then the old way where you had to use a special Score IDentifier to read out the scores. These are not being produced anymore. So if you use(d) this in the museum for a tour, you will have to make some adjustments to the tour!

Adding audio stops for the pronunciation of the scores

To be able to playback an audio file which tell you the score (when pointing at a Score IDentifier) you need to record and add these to your tour, just as any other Stop. So in the example above, if you chose to pronounce the exact score you will need to add 11 Stops in your tour or when using categories, 3 Stops. 

The next step is to add triggers to these score Stops (not actual IDentifiers but score pronunciation triggers) which can be found when you select “show more” when adding a trigger. Note; you can only choose these triggers if your site has been set to this mode by Guide ID. So if you cannot select them contact us at helpdesk@guideid.com and we implement this setting on for you.

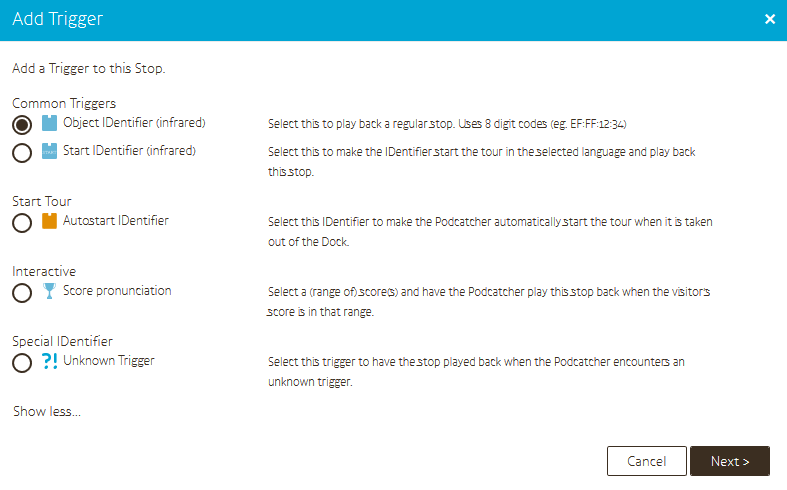
When you have selected Score pronunciation, a new screen will pop up in which you can add the score;

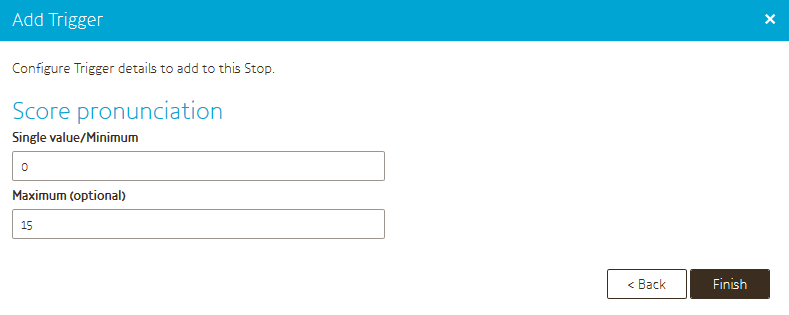
When using exact scores you only need to fill in the actual score for that stop in the field Single value / Minimum.

If you use categories you enter the lowest points of that range in the field Single value / Minimum and the highest points of that range in the field Maximum.

When you press finish the triggers will be added to your stop. For a single score stop it will show one trigger, for a category it will show all the triggers in that range.

What are the replacement fees for our hardware?

Hardware that becomes defective during normal use, will be replaced free of charge for the duration of the contract period. If you have such hardware, you can send it to our head office for replacement. Here you can read how to do that.

In case your hardware gets lost, stolen or severly damaged we have to charge the replacement fees which you can find in the table below (prices are per piece and in euro’s, ex. VAT)


How can I prevent Podcatchers from going into an error state?

Podcatcher we receive for repairs often don’t include a description of what’s wrong with them, and sometimes returned players seem to work just fine. To give you a better understanding of the general meaning of the lights on the Podcatchers and the required action, we have made the Podcatcher LED Status sheet.  Combining that and the Podcatcher LED Error sheet you can determine whether or not a Podcatcher (in an error state) needs to be sent for repairs.

Although we always replace our Podcatchers (which are in an error state or need to be repaired) free of charge, we would like to prevent you from unnecessarily spending money on shipping costs.

To make optimal use of our system and prevent your Podcatchers from going into an error state it’s important to:

  • Place a Podcatcher back into the Dockingstation when returned after use, so it can charge again
  • Firmly push the Podcatcher into a slot when placing it back into the Dockingstation
  • Place all Podcatchers back into the Dockingstations at the end of the day, so they can charge and sync overnight
  • Always sync replacement Podcatchers (whether for missing or repaired players), because they do not hold the content yet
  • You can try syncing a Podcatcher with an error in a different slot to make sure the problem doesn’t lie in the Dockingstation slot
  • Make sure the Sync Console is up, running and connected to a wired internet connection 24/7

If the Podcatcher has been physically damaged, has a distorted sound or makes a rattling sound when shaken, it needs to be replaced. Hardware defects can’t be solved by syncing the player.

I have received the hardware, what next?

Note; You can start building your new tour in the Toureditor without the hardware being present.

As soon as you receive the hardware from us, you can finalize the tour by connecting the IDentifiers (triggers) to the stops in your tour. You need to connect at least one IDentifier to each stop in your tour. Every IDentifier has a unique number which you can find on the back of the IDentifier (for example EF:FF:FF:43).

There will be 1 or more IDentifiers with a language/country flag, these need to be connected as a Start IDentifier for the different languages in which you provide the tour. (Note; you need a different IDentifier for each language).

When all the stops are added in the tour (have an IDentifier connected and contain an audio file) you need to “publish” the new tour. After that you can mount the IDentifiers next to the objects in the exhibition.

The rest of the installation is very simple;

  • Connect the Dockingstations to the Sync Console or Syncbox that we have provided and plug everything into the power socket.
    Note; a Sync Console will already be installed and linked to your site. A Syncbox needs to be connected by the customer (see instructions)
  • Insert the Podcatchers firmly
  • Connect the Sync Console or Syncbox to a wired internet connection (note the whole set up needs to stay connected to power and internet 24/7)
  • Start the Sync Console or Syncbox
  • Log on to the Podcatcher Portal, go to “sync” and press Sync Now.
  • Now the content will be synced on to the Podcatchers.

We have made an instruction video available as well. In this particular video we show you how to install the setup with loose, new Dockingstations and a Syncbox.

The 10 Podcatchers in a Dockingstation are synced one after another, but all connected Dockingstations start and sync simultaneously.

When a Podcatcher light turns green, you can take it out and start testing your new tour.

Every day our server connects automatically to the PC provided, and checks the Podcatchers to ensure updates are written on to the Podcatcher, to restore Podcatchers which have an error and to retrieve the logs and statistics from the Podcatchers to add to the Analytics.

Please feel free to contact helpdesk@guideid.com if you have any questions.

How do I include my visually and hearing impaired visitors

An audio tour for the blind and visually impaired visitors

Audio is a very important and powerful tool for the blind and visually impaired when visiting a museum. So make sure  you include the unmissable stories of your museum in your audio offering.

An audio tour is often offered as an addition to the room texts, but often the room texts cannot be read (or read properly) by these visitors.  So for this target group it would be an option to include the room texts in your audio tour in an extra layer. The visitor can then optionally listen to this or not.

Also, the information you give about the object or the way you describe it can be very helpful for your visitors  to give them more understanding. Therefor it might be helpful to have your texts edited or redacted by a professional writer.

Because our system works with IDentifiers (IR sensors)  to trigger the audio, it’s always important that these IDentifiers can be spotted easily in your exhibition. We would like to advise to always design the IDentifier labels in a striking color, preferably contrasting with the wall. This makes it easier for visually impaired visitors to start the audio themselves. This solution sounds very clear, but often these plans are not supported by the designers of the exhibition. IDentifiers labels are often made in very discrete colors and are therefore difficult to notice for the visually impaired. Also try to be consistent in the place and height when mounting the IDentifiers, for instance always place them on the right side of the object at 1.30m from the ground.

An audio tour for the deaf and hearing impaired visitors

Using our App makes it possible to offer the actual text from your audio tour to the deaf or hearing impaired visitors in your museum. The texts have already been written for the audio tour and can be shown one-on-one in the Mobile Website. It seems like a very simple solution, but be aware that visitors and deaf or hearing impaired visitors do not all share the same level of understanding when it comes to reading a text. A useful website you could visit about this topic is  https://www.wattelt.org/musea-in-gebaren

If you would like more information on how to include your visitors, please contact our Business Managers, they are very happy to help.

How do I clean the Podcatchers?

Gently wipe them with a slightly moist soft cloth with a regular all-purpose household cleaning product, or use a disposable all- purpose cleaning tissue. Please keep water temperature below 60 °C to prevent degradation of the Podcatcher plastic.

We suggest to use normal (all-purpose) cleaning products, or specific types of alcohol wipes to clean the Podcatcher:

  • Soap
  • Ajax cleaner
  • Detergents
  • Isopropyl Alcohol (IPA) wipes
  • Ethyl Alcohol wipes (Ethanol, with concentration up to 96%)

Make sure not to use acetone or ammonia based cleaning products, or to expose the Podcatcher to strong bases or acids.