To give you a good impression on how to add an AV-Sync stop in your tour, we have made a short video. It briefly takes you through the steps; how to prepare the video, what to do in the Toureditor and how to connect the hardware. Detailed information can of course be found in the AV-Sync IDentifier articles on this helppage.
Category: AV-Sync IDentifier
AV-Sync Testmode
The AV-Sync Testmode is a Podcatcher mode which gives acces to 2 AV-Sync specific features to setup your AV-Sync clips. The mode is used for the following cases:
- To determine the desired AV-Sync offset
- Measure an estimate for the AV-Sync loopdelay.
Note: when you are already content with the synchronization between the Podcatcher audio and the video, you do not require these features.
Usage
The AV-Sync testmode is activated by removing the Podcatcher from the dock whilst holding the middle (B) and right (C) buttons at the same time. The testmode is recognised by the yellow led which blinks together with the green led when a tour is started.
AV-Sync offset
The AV-Sync offset is used to adjust the synchronization between the Podcatcher audio and the video by playing the audio a fraction earlier or later.
The following instructions explain how the testmode is used to determine the desired AV-Sync offset value.
- Aim the Podcatcher, in AV-Sync testmode, at the AV-Sync IDentifier.
- Use the left and right buttons to in- or decrease the AV-Sync offset on the Podcatcher. After every press the value is pronounced* .When pressing the middle button the value is reset to 0.
- Re-aim the Podcatcher to the AV-Sync IDentifier. The audio will now be played with the selected AV-Sync offset. Notice the red led which indicated the audio is played with an offset.
- Repeat from step 2 until you are happy with the synchronization.
- Press the middle button while audio is playing to pronounce the last used offset value. Enter this value as AV-Sync offset for this AV-Sync clip.
* Minus is pronounced as “Foxtrot”
AV-Sync loopdelay
With the AV-Sync loopdelay the audio can be brought back in sync after a loop, by delaying the audio.
The following instruction explain how the AV-Sync testmode is used to make an estimate for the desired loopdelay value.
- Aim the Podcatcher, in AV-Sync testmode, at the AV-Sync IDentifier.
- Await the video loop and aim at the AV-Sync IDentifier again around 10 seconds in the video.
- The Podcatcher will pronounce an estimate of the desired loopdelay value. Enter this value as AV-Sync loopdelay for this AV-Sync clip.
Due technical limitations the Podcatcher cannot determine the exact value. Try the following to make a better estimate of the required value:
- Await multiple video loops before the 2nd scan of the AV-Sync IDentifier, and divide the pronounced value by the amount of loops.
- Perform multiple measurements and take the average.
- Test the synchronization after setting the loopdelay, publishing and syncing. Adjust the value with little steps in case you are not yet happy with the synchonization.
Note: PC’s do not have a constant loop time when used for video playback. Use a dedicated media player for constant video looping.
AV-Sync media file preparation
1. General
Two steps are required to prepare your video for use with AV-Sync:
- Prepare the video file (replace the audio with the AV-Sync track). The video file will play on your mediaplayer.
- Prepare the audio file (split off the audio from the video to a MP3 file). The audio file will be uploaded in the TourEditor to be played on the Podcatcher.
Creating these files is an automatic process when using the video tool.
For more information on the usage of the tool, or for detailed instructions on how to do the media file preparation manually, please refer to the following sections.
2. AV-Sync video tool
The easiest way to prepare you media files is by using the AV-Sync video tool. You can download it here:
https://help.guideid.com/downloads/AV-Sync_Video_Tool_0.4.exe
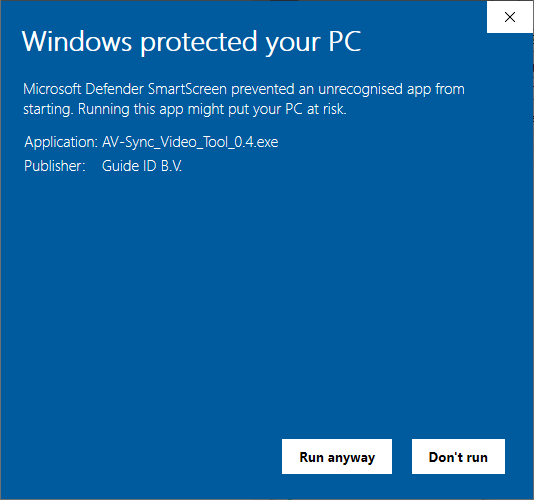
Note: When opening the program, you may see the message “Windows protected your PC”. Please click the button “Run anyway” to continue.
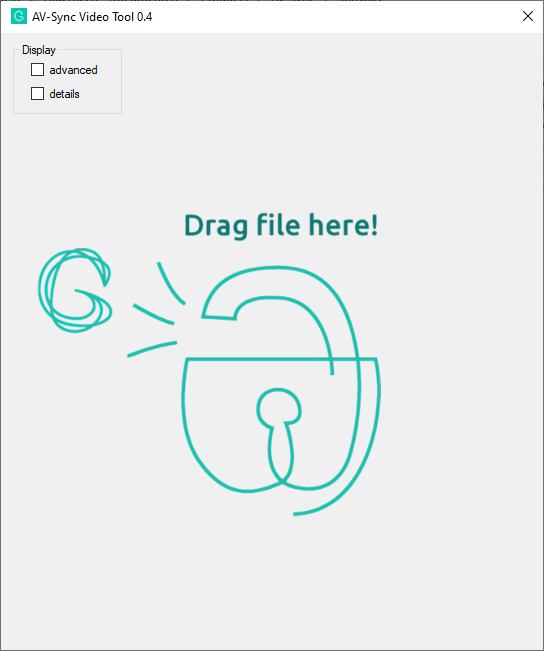
You can drag and drop any video on the tool, and it will create two new files in the same directory as the input file:
- <inputfilename>_video.mp4
- <inputfilename>_audio.mp3
The video file is to be placed on your mediaplayer. The audio file is to be uploaded in the TourEditor, to play on the Podcatchers.
2.1. Advanced video settings
If the advanced checkbox has not been selected, the video tool will use settings that suit most cases. If it has been selected, the following video options are available:
- Convert: This checkbox enables conversion of the video. When unchecked, the video content is ‘multiplexed’ into the output file unmodified. This means that video resolution and quality will remain unchanged. When checked, video is transcoded to the h264 codec. Note that conversion may be automatically enabled, if your video is encoded using a video codec that is not supported in MP4 files. If so, the progress will indicate “Converting video”.
- Flexcode: This checkbox enables the IDentifier code input field to be used for flexible mode AV-Sync videos. Please refer to the AV-Sync manual for details.
- Room audio: If unchecked, the output video will contain the AV-Sync track instead of the original audio. If checked, the original audio is converted to a single channel and added to the output video as well. The output video will contain a stereo audio track, with the AV-Sync track on the right, and the original audio on the left channel. This makes it possible to still play the original audio in the room with the video, in addition to hearing the audio on the Podcatchers.
2.2. Advanced audio settings
If the advanced checkbox has not been selected, the video tool will use settings that suit most cases. If it has been selected, the following audio options are available:
- Bitrate: Choose the bitrate for the audio to be played on the Podcatchers. Note that a higher bitrate improves the quality, but also the time required to sync the Podcatchers. We advice a bitrate of 64k for mono, and 128k for stereo. If left to auto, the encoder uses the input file to choose the best bitrate for you.
- Channels: Choose the amount of channels for the audio to be played on the Podcatchers. If the input file contains stereo audio, you may choose to reduce it to mono. This way the bitrate can be reduced, reducing the sync time per Podcatcher. Using stereo is advised when using headphones.
- Extend: This input field allows extending the audio file with silence for the specified time. This could be used for loop correction, however preferably use the slider in the tour editor to configure this: see “Fine tuning” in the AV-Sync manual.
AV-Sync troubleshooting EN
AV-Sync troubleshooting NL
AV-Sync DIP-switch settings
When using AV-Sync, you need to set up the DIP-switches on the AV-Sync Box. These DIP-switches are linked to the IDentifier codes in the TourEditor.
You’ll find a full list of codes with DIP-switch settings here: Specsheet AV-Sync DIP switch
Specsheet AV-Sync (IDentifier)
The Podcatcher can synchronously play the audio of a movie when the movie is equipped with a AV-Sync Track.
In the specsheet you can read what a AV-sync set contains and what the measurements are: Specsheet AV-Sync
AV-Sync manual
1. General
1.1. What can you do with AV-Sync?
Using AV-Sync, you can play audio on the Podcatcher synchronized to a video playing on a screen. This way multiple visitors can simultaneously watch the video on the screen and listen to the audio (in their own language) on the Podcatcher. There is no limitation to the number of visitors watching the video.
1.2. Package contents
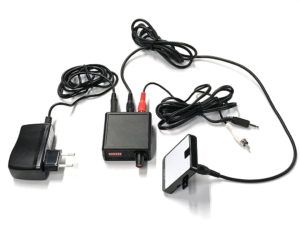
AV-Sync IDentifier
This is the point of activation used for visitors to aim the Podcatcher at.
AV-Sync box
The AV-Sync box provides the AV-Sync IDentifier with the proper signals to transmit to the Podcatcher, such that the correct audio fragment is played on the Podcatcher at the right time.
5V-power adapter (narrow connector)
The power adapter provides the AV-Sync setup with power.
Audio cable
The audio cable connects the media player (refer to 1.3) to the AV-Sync box. The cable has a 3.5mm jack plug on one end and two RCA connectors on the other.
RCA cable
The RCA cable connects the AV-Sync box with the IDentifier.
1.3. Further requirements
1.3.1. Standard
Screen or projector (not included)
A television or other type of screen, suitable of displaying your video.
Media player (not included)
A media player suitable for playing your video. The media player requires an ‘audio out’ connector to connect to the AV-Sync setup. If desired, it must be able to play the video in a loop. The media player plays the video on the screen and/or projector, and sends the audio signal from the AV-Sync track to the AV-Sync box. Guide-ID recommends using a Brightsign media player.
Video content (not included)
The original video, combined with the AV-Sync track.
Audio content (not included)
The original audio track of the video to play, converted to MP3 format. Recommended encoder settings: 64 kbps, mono, 48 kHz, -1dB peak level. Different MP3 bitrates as well as stereo can be supported.
AV-Sync video tool (downloadable)
To prepare the audio and video content to use with AV-Sync you can use the AV-Sync video tool.
1.4. Overview of the AV-Sync box
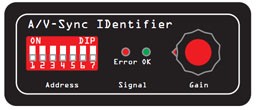
Address
These DIP-switches can be used to set the IDentifier code that the AV-Sync Box transmits.
Error LED (red)
The red LED blinks when an invalid AV-Sync track is received from the media player. If the LED lights up continuously, no signal is being received at all.
OK LED (green)
The green OK LED blinks when a valid AV-Sync track is received from the media player.
Gain knob
Using the turnable Gain knob, the incoming signal from the media player can be amplified. The signal is amplified by turning the knob to the right.
Note: Try setting the gain as low as possible (knob turned to the left).
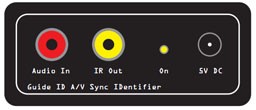
Audio In connector
The media player connects to the AV-Sync box on this connector.
Note: Connect the red RCA plug of the audio cable. The white connector can be left unconnected. The AV-Sync box requires only mono audio.
IR Out connector
This connector is used to connect the supplied AV-Sync Identifier, using the RCA cable.
ON LED (yellow)
The yellow LED lights up continuously if the AV-Sync box is powered.
5V DC connector (narrow plug)
The supplied 5V power adapter connects to the DC connector to power the AV-Sync box.
2. Installation
2.1. General device function
The media player plays the video on the screen in the exhibition. It simultaneously sends the AV-Sync track to the AV-Sync box. The box combines the signal with a unique IDentifier code and transmits the signal in infrared using the AV-Sync IDentifier. Any Podcatcher receiving the signal translates the IDentifier code to the audio fragment to play, and translates the AV-Sync signal to the offset in time where the video is currently at. This way it plays the audio synchronously with the video playing on the screen.
A single signal suffices for the Podcatcher to play the audio for the entire video in sync. It is not required to keep aiming the Podcatcher at the IDentifier.
2.2. Media file preparation
Two steps are required to prepare your video for use with AV-Sync:
- Prepare the video file (replace the audio with the AV-Sync track). The video file will play on your mediaplayer.
- Prepare the audio file (split off the audio from the video to a MP3 file). The audio file will be uploaded in the TourEditor to be played on the Podcatcher.
Creating these files is an automatic process when using the video tool:
https://help.guideid.com/downloads/AV-Sync_Video_Tool_0.4.exe
To create the required output files in the same directory as the input file, just drag and drop the video on the tool.

Note that when both the mediaplayer and Podcatcher are setup to automatically restart the video, in most cases you will need to extend the audio. To do this select the advanced checkbox, and change the value at the ‘extend’ input accordingly.
For more information on the usage of the tool, please refer to the following page:
https://help.guideid.com/kb/av-sync-media-file-preparation/
2.3. Configuration in the TourEditor
This part of the installation requires the online TourEditor.
- Log in to the Portal, click on the TourEditor icon, and choose the Tour you’d like to add AV-Sync to.
- Make a new Stop (or choose an existing one) and go to the General tab.
- Tick the “AV-Sync” box and save.
- Go to the Stop’s Clips.
- Edit the first Clip, and upload the audio as appropriate for each language.
- Use the audio file that has been split off from the video (see 2.2).
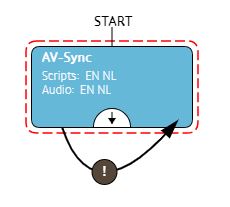
- In most cases, the video will loop, so the audio should as well. In the Clip flow editor, add an “auto continue” connection from the clip to itself to make it loop on the Podcatcher as well (refer to the image on the right).
- Configure the Stop Trigger by adding an AV-Sync IDentifier to the Stop. Read more about Triggers here.
- For regular AV-Sync, the IDentifier code ranges from A0:01 to A0:7F. You can choose a code and set the DIP switches on the AV-Sync IDentifier (or vice versa).
- For AV-Sync in flexible mode, the IDentifier code ranges from A1:00 to A1:FF. The exact code depends on which track the video sends out to the AV-Sync IDentifier. You can choose the code during media file preparation in the AV-Sync tool.
- For a full list of codes with DIP-switch settings, click here: AV-Sync DIP-switch settings
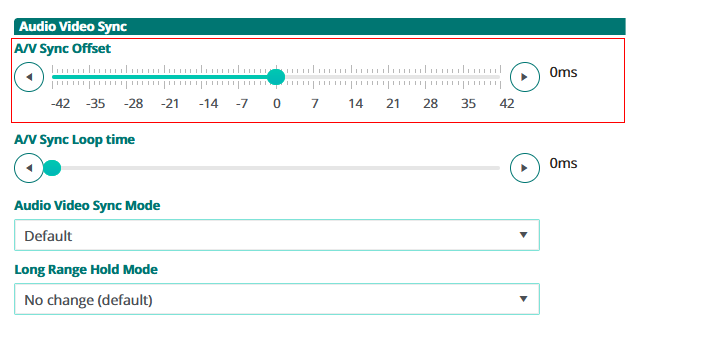
- If required, fine-tune the Audio Video Sync Offset on the Clip Advanced tab. This is normally not required, you can leave it at the default value of 0. By adjusting the offset, you can compensate for any delays that are introduced in the video stream.
- Publish the Tour and Sync so the Podcatcher will sync the content on to its SD card.
2.4. Installing the AV-Sync set
- Connect the media player to the screen or projector. This is usually done with a HDMI cable. Follow the instructions provided with the media player.
- Connect the AV-Sync box.
- Connect the 3.5mm audio jack of the provided audio cable to the ‘audio-out’ connection of the media player;
- Connect the red RCA connector on the other end (the right audio channel) to the AUDIO IN connector of the AV-Sync box.
Notice: Do you want audio to play at the screen (not just on the Podcatcher)? Then connect the white RCA connector of the audio cable to the screen or amplifier.
Notice: Don’t extend the audio cable between media player and AV-Sync box. This will cause signal degradation and may cause the AV-Sync box to be unable to decode the signal.
- Configure the IDentifier code on the AV-Sync box.
The AV-Sync box can be assigned a fixed IDentifier code (regular mode), or can be configured to pass-through the IDentifier code from the video that is being played (flexible mode). The DIP switches are used to configure both the mode and the fixed address (if applicable).- For regular AV-Sync move the ADDRESS pins to the binary orientation that matches the last three digits of the code assigned in the TourEditor. For example, if the code is A0:01, the leftmost ADDRESS pin is moved to the upper position, all others are low. If the code is A0:02, the second pin from the left is the only pin in the upper position.
- When using AV-Sync in flexible mode move all ADDRESS pins to the upper position. The AV-Sync box now expects to receive the IDentifier code from the AV-Sync track encoded in the video. This allows for playback of different videos on a single AV-Sync box (where each video contains a different AV-Sync track).
- After configuration of the AV-Sync box IDentifier code, the device must be restarted by briefly disconnecting the power and reconnecting it.
- Connect the AV-Sync IDentifier with the provided RCA to the IR OUT connector on the AV-Sync box. The RCA can be extended if required.
- Connect the power adapter to the 5V DC connector on the AV-Sync box and plug it in to a main power outlet (100-240V AC / 50-60Hz)
- Place the AV-Sync box and IDentifier close to the screen displaying the video, to make it intuitive for the visitors to use it. Make sure the connecting cable and AV-Sync box are properly installed out of view, but still reachable.
- Test the video.
- Start the video on the media player and check if it is properly displayed on the screen.
- Check the volume of the media player to be unmuted and not too quiet.
- Turn the GAIN knob on the AV-Sync box all the way down (counter-clockwise). Subsequently slowly turn it up (clockwise), until the green light starts blinking.
- Test the audio.
- Point an activated Podcatcher to the IDentifier. Wait for the ‘beep’ indicating activation, and listen to the Podcatcher to confirm that the audio of the video is being played.
- If the Podcatcher won’t play the clip, check if the green LED on the AV-Sync box blinks periodically. If not, try to exchange the red and with RCA plugs of the audio cable connecting to the AV-Sync box, and test again. If the problem persists, confirm the IDentifier code and sync state in the TourEditor.
3. Usage
The visitor can use the AV-Sync simply by pointing the Podcatcher at the AV-Sync IDentifier, just like any other IDentifier.
He or she will hear the audio synchronized to the playing video and in their own language, regardless of how far the video playback has progressed.
4. Fine tuning
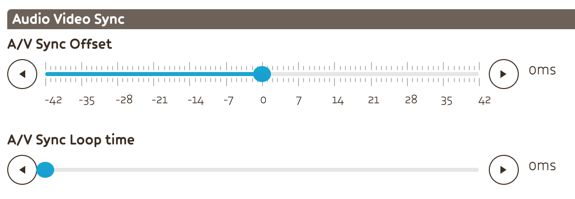
4.1. Offset correction
Our AV-Sync solution will play audio on the Podcatcher lip-sync to the video, if the original audio would play in sync in the same setup (i.e. instead of the AV-Sync track, plays the original audio).
In some cases this is not the case, most notably when the video stream gets delayed in for instance a 4K television screen, but the audio stream is taken directly from the mediaplayer. It is advisable to avoid these kind of setups by using the audio output from the television screen. If this is not possible, if it for instance doesn’t have the right connection, you can resolve the delay in the tour editor.
Offset correction consists of two steps:
- Measure the time difference between audio and video before the clip restarts. You can measure it manually, or use AV-Sync Testmode.
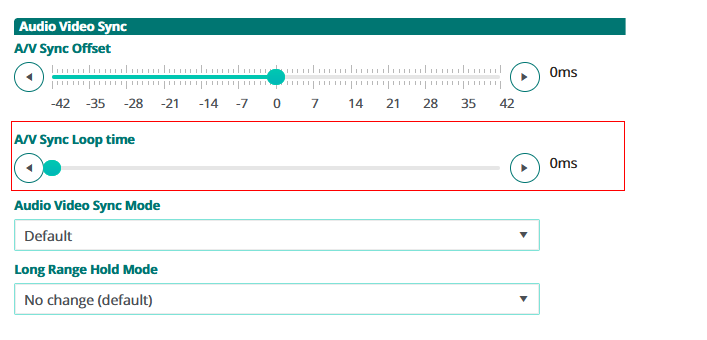
- Adjust the slider “A/V Sync Offset” in the tour editor
4.2. Loop correction
If both the mediaplayer and the Podcatchers have been configured to automatically restart the video, keeping lip-sync audio may require applying a loop correction. The reason for this is that in most cases, the Podcatcher is quicker to restart the audio than the mediaplayer is to restart the video, causing them to lose perfect sync, if visitors are out of range of the IDentifier. Note that applying loop correction is not required when using Long Range mode or Interactive mode, where visitors remain in range of the IDentifier. The audio will in these cases automatically re-sync when the clip restarts.
Loop correction consists of two steps:
- Make sure audio and video are in perfect sync before the clip restarts
- Measure the time difference between audio and video after the clip restarts. You can measure it manually, or use AV-Sync Testmode.
- Adjust the slider “A/V Sync Loop time” in the tour editor
5. Troubleshooting
5.1. Should the AV-Sync IDentifier not work properly, please check the following first:
- Is the audio cable properly connected to the AV-Sync box and the media player?
- Is the RCA cable properly connected to the AV-Sync box and the IDentifier?
- Are the power adapters properly connected to a power outlet on one end and the AV-Sync box and media player on the other?
- Does the video being played have an AV-Sync track playing on the right-hand audio channel?
- Is the AV-Sync IDentifier code properly set on both the AV-Sync box as well as the TourEditor?
- Have you activated the Podcatcher with a Start IDentifier?
- Has the Podcatcher been synchronized with the correct content?
If that didn’t solve your problem, restart the AV-Sync box by unplugging the 5V power adapter and plugging it back in after half a minute or so. Sometimes restarting the media player also helps.
5.2. Should the AV-Sync IDentifier still be throwing a temper tantrum, check the following:
The yellow LED isn’t lighting up
- The 5V power adapter isn’t connected to a proper power outlet, or
- Its cable isn’t properly connected to the AV-Sync box, or
- The adapter broke.
Find a working power outlet or replace the 5V power adapter.
The green LED is blinking, but the Podcatcher isn’t responding
- Is the RCA cable properly connected to the IDentifier? You can try squeezing the connectors a little bit to make better contact.
- Has the Podcatcher been activated with a Start IDentifier? If not, try activating it and trying again. You can also test with a different Podcatcher to verify.
- Has the Podcatcher been synced with the correct content? Try syncing manually and try again.
The red LED is blinking
The AV-Sync box is receiving a signal, but not a proper time code. Lower the volume of the media player by 20%. Restart the AV-Sync box by unplugging the power adapter and plugging it back in. Reconnect the audio cable between the media player and the AV-Sync box. Turn the Gain knob until the green light starts lighting up. Test the audio output of the media player with headphones or speakers to check if you can hear the AV-Sync track (beeping noises at regular intervals). If you don’t hear the beeps, the AV-Sync track isn’t added to the video or the audio output isn’t selected on the player. Alternatively, the audio track was added to the left channel, in which case you can swap the white and red RCA plugs.
The audio plays, but always from the start of the video
Make sure the Stop is in AV-Sync mode in the TourEditor, publish and try again.
5.3. Try the Troubleshooter
To try to determine the cause if any problem, you can try the AV-Sync troubleshooter: