Prévenir la disparition de vos Podcatchers
Introduction
Lorsqu'un visiteur utilise un Podcatcher, on peut s'attendre à ce qu'il le rende après usage. Cependant, certains visiteurs peuvent négliger ou simplement oublier de le faire. Pour réduire le nombre de Podcatchers "disparaissant" au fil du temps, il existe deux façons d'activer un signal d'avertissement intégré au Podcatcher pour avertir les visiteurs qu'ils doivent rendre l'appareil. La première est un identifiant spécial appelé identifiant d'avertissement, la seconde est un réglage du Podcatcher, à savoir l'"alarme de temps d'inactivité". Vous pouvez utiliser l'un ou l'autre, ni l'un ni l'autre, ou les deux, selon ce que vous jugez approprié.
Identifiant d'avertissement
Le Podcatcher peut émettre un signal d'alerte lorsqu'il reçoit un code d'identification d'alerte. Il s'agit d'un identifiant spécial qui est généralement placé près de la sortie du bâtiment afin que les visiteurs soient avertis au bon moment.
Les avantages de cette méthode sont que les Podcatchers sont plus susceptibles d'être déposés au fil du temps (en particulier si vous y attachez une lanière ou un bracelet), et que votre personnel saura demander à certains visiteurs de rendre le lecteur avant de quitter le bâtiment.
L'inconvénient est que le Le signal IR ne passe pas beaucoup en matière de tissu ou de cuir, c'est-à-dire Les podcatchers ne sonneront pas le signal d'alarme s'il a été mettre dans un sac ou une poche.
Installation de l'identificateur d'avertissement
ATTENTION : Évitez de regarder directement la face avant de l'identificateur d'avertissement à courte distance ! Les DEL infrarouges de l'appareil sont invisibles à l'œil humain, mais elles sont très brillant, surtout à courte distance.
Test :
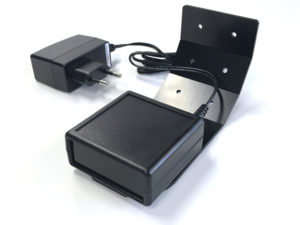
- Branchez l'adaptateur sur une prise de courant et la fiche de l'adaptateur sur l'entrée 9V DC de l'identificateur d'avertissement. Bien qu'il y ait également un connecteur RCA à l'arrière, vous ne devez brancher que la fiche de l'adaptateur 9V DC et rien d'autre.
- Les deux DEL situées à l'arrière de l'appareil clignotent en vert pendant quelques secondes.
- L'identificateur d'avertissement commence alors à transmettre des codes d'alarme. Le voyant supérieur doit être rouge et le voyant inférieur doit clignoter en vert chaque fois qu'un code d'avertissement est transmis (environ 4 fois par seconde).
- Prenez un Podcatcher dans la station d'accueil. Le signal d'avertissement doit retentir lorsque vous êtes à portée de l'identificateur d'avertissement. Il dure environ 120 secondes. Vous pouvez arrêter le signal d'avertissement en appuyant sur l'un des boutons du Podcatcher, mais lorsque vous êtes encore à portée, il retentit à nouveau !
Configuration :
Vous pouvez modifier la puissance de transmission de l'identificateur d'avertissement en réglant les commutateurs rouge/blanc situés à l'arrière de l'appareil.
Le changement s'opère immédiatement et chaque augmentation ajoute environ 2 à 3 mètres de portée.
Commutateur 1 activé, tous les autres désactivés = intensité 25%
Commutateur 1 et 2 en position haute, tous les autres en position basse = intensité 50%
Commutateur 1, 2 et 3 activé, tous les autres désactivés = intensité 75%
Commutateur 1, 2, 3 et 4 en position haute, tous les autres en position basse = 100% intensité
Montage :
Les Podcatchers ne peuvent réagir au signal d'avertissement que lorsqu'ils sont à portée de vue de l'identificateur d'avertissement. L'identificateur d'avertissement envoie des signaux infrarouges et les infrarouges ne peuvent pas traverser les objets, c'est pourquoi l'identificateur d'avertissement fonctionne mieux lorsque le Podcatcher est dirigé directement vers lui. Il est conseillé de placer l'identificateur d'avertissement de manière à ce qu'il ait le plus de chances d'atteindre un Podcatcher.
Lorsque l'identificateur d'avertissement est installé près d'une sortie, il est préférable de le placer au plafond, face aux visiteurs à l'intérieur du bâtiment, afin que les visiteurs qui se dirigent vers la sortie soient les plus susceptibles de se trouver à portée de l'identificateur d'avertissement. Lorsqu'il est installé près d'une entrée, il est préférable de placer le dispositif dans l'autre direction, c'est-à-dire vers l'extérieur du bâtiment, car s'il est orienté vers l'intérieur, il est très probable que l'identificateur d'avertissement déclenchera également des Podcatchers au comptoir de distribution.
Veuillez expérimenter l'emplacement et la direction/l'angle qui conviennent le mieux pour atteindre les Podcatchers, sans interférer avec les opérations normales.
Signal d'avertissement après le temps d'inactivité
Le Podcatcher peut également émettre un signal d'avertissement lorsqu'il est engagé dans une tournée et qu'il n'a pas diffusé d'audio depuis un certain temps. Par défaut, cette fonctionnalité est désactivée, mais vous pouvez la configurer dans la section Paramètres du site Podcatchersous "Temps d'inactivité du Podcatcher avant le déclenchement de l'alarme".
L'avantage de cette méthode est que le signal d'alarme retentit toujours au bout d'un certain temps, à moins qu'il n'ait été remis correctement. Les inconvénients sont les suivants : si vous réglez le signal d'avertissement trop rapidement, les visiteurs risquent d'être agacés ; si vous réglez le signal d'avertissement trop tard, le visiteur risque d'être déjà dans le bus qui le ramènera chez lui au moment où il se déclenchera. En outre, si votre site ne recueille pas les Podcatchers dans des quais après que les visiteurs ont terminé la visite (comme une boîte de dépôt), ils peuvent commencer à produire un refrain très ennuyeux au fil du temps.
Déclenchement de la post-alarme
Il est possible de faire en sorte que le Podcatcher joue l'audio après avoir émis le signal d'avertissement en utilisant le déclencheur Post-Alarm dans un arrêt. Le Podcatcher jouera le son après que le signal d'alarme a cessé de retentir (soit parce qu'il a joué pendant toute sa durée, soit parce qu'on a appuyé sur un bouton). Comme tout contenu, il est localisé dans la langue de la visite.
Prévenir l'absence de Podcatcher
Il existe un certain nombre de moyens de minimiser le risque de perte des Podcatchers. Vous trouverez ci-dessous dans la fiche technique un certain nombre de conseils et de bonnes pratiques.