Introduction
MapMyVisit is Guide ID’s marketing platform, intended to be used by your visitors. They register their Podcatcher at the beginning, during, or at the end of the tour via a console by entering their email address. The Podcatcher saves which objects are and aren’t visited, even if they’ve been visited after using the console. After their visit the visitors receives an email thanking them for their visit and showing them a link to their personal page within MapMyVisit where they can re-experience the tour.
The visitor can use their personal page to view and listen to tours again. You are also able to place strategic links to your homepage, other websites for more information, your web shop, events page, ticketing page, et cetera on these personal pages. All of these links are placed to created more traffic to your other webpages, offer the visitor even more information and to increase visits and revenue. Links to your web shop can be to relating products and merchandise. Visitors’ email addresses are saved within the MapMyVisit platform, on Guide ID’s servers. You can contact them through Guide ID, but please note that we will not share these contact details with you directly because of the EU General Data Protection Regulation (GDPR). For this reason it’s also not necessary to sign a data processing agreement when you use MapMyVisit.
Social media is also a big part of MapMyVisit. Via MapMyVisit visitors can follow you on Facebook and Twitter with the click of a button. It’s also possible to share or post an individual part of the tour to their own personal page for all their contacts to see. We also add a button linking the visitor to your friends page or newsletter page. Final results: extra promotion, more branding, more visitors and extra revenue streams.
The MapMyVisit console
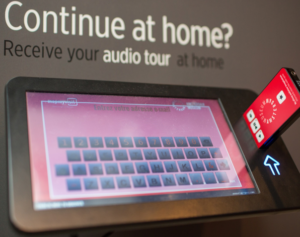
 The MapMyVisit console – the rectangular device with a touch screen and an opening for a Podcatcher – is simpler than you might expect. The process is as follows:
- Once it’s plugged in to a power outlet for the first time, it’ll need some touch screen calibration.
- Then some settings need to be configured, such as which languages should be presented while idle.
- After setting it up, the console will wait for a Podcatcher to be inserted into the slot. While waiting, it will cycle through the available languages on its display with instructions for the visitor on how to operate it.
- When a Podcatcher is inserted, it will prompt the visitor with our privacy policy, which the visitor can (but generally doesn’t) read up on how Guide ID processes their personal data. If you’d like to read it, click here.
- If the visitor doesn’t accept the privacy policy, the console will ask the visitor to remove the Podcatcher; if they do accept, the visitor can enter their e-mail address, double-check, and confirm it.
- The console will then store the e-mail address on the Podcatcher itself. When the Tour concludes and the Podcatcher is handed in and synced, the visitor will receive an e-mail from MapMyVisit with a link to their personal page, where they can experience the Tour again.
Note: MapMyVisit will only show Tours and Stops that have MapMyVisit enabled on them. See the Portal section below.
As you can see – fairly straightforward. The console does not need an internet connection for it to do its job properly. If you’d like to test it, you can do so by simply listening to your Tour with a Podcatcher and entering your (work) email address.
Installation (hardware)
When you get your MapMyVisit console, all you need is a spot you want the console to be, a nearby power outlet, and a few minutes to configure the settings.
If you’d like to just change the available languages, simply reboot the console and skip to step 2.
Step 1. Connect the console and calibrate it
- Connect the console to the power outlet. It will automatically switch on.
- Complete touch screen calibration by selecting the target icon (
 ) in all 4 corners and the center. The console will reboot.
Step 2. Language selection
- Switch on the console (or wait until it has rebooted).
- Place a Podcatcher into the console.
Note: the Podcatcher has to have been activated by a Start IDentifier (it must have started a Tour in any language).
- Agree to the privacy policy by pressing the arrow to the right.
- When asked for an e-mail address, enter “settings”. A screen should open as the last letter is typed.
Note: Typing “settings” to open the menu only works in the first minute after starting the console.
- The settings screen shows all available languages. To make changes, you must first clear the active language settings by pressing the recycle bin icon at the bottom left.
- Now you can add languages as you like. The selected languages are shown in order at the bottom of the screen. The order in which languages are added matters, as that dictates the order in which they show up on the console while it’s idle. To navigate through the list you can use the arrow icons at the top and bottom of the screen. To add a language, first select it and then press the check mark on the right-hand side.
- When all languages have been added in the desired order, you can save the settings by pressing the save icon (
 ).
).
- The languages are now saved and you will return to the main screen. The console is ready to use.
Getting the Tour ready in the Portal
Note: The content made available on MapMyVisit is largely identical to the content in the Podcatcher App, so if you’ve made content for one, it should be mostly done for the other as well. Check the Tour’s Publish page to be sure.
To start off, the Tour you want to have available for the MapMyVisit platform will have to be made available for it. In the Tour General screen, tick the box next to MapMyVisit if it isn’t enabled already and click Save. When you make a new Tour, you can also tick the box in the “Add Tour” popup. This, as you would expect, makes the Tour show up in MapMyVisit if a visitor has used the MapMyVisit console and left their email address. However, the Stops also need to be made available. Keep in mind that you usually don’t want all of the Stops to be visible in MapMyVisit as they would be redundant – such as the language selection Stop or the one for invalid IDentifiers.
Stops can be identified at a glance in the Stops list, with the Availability column. A grey “MMV” icon means it won’t be available in MapMyVisit, a blue one means it will be. Clicking on this icon will also take you to the Stop General screen, where you can toggle the MMV availability on or off.
The 4 default Stops
You will also find 4 default MMV Stops in your new tour; The first stop MMV00 Instructions contains an audio file to which you can add a normal IDentifier (trigger) which explains to your visitors what MMV does. You can use this Stop but are not obligated to use it.
The other 3 Stops contain audio instructions for the console for which you have to add the complementary triggers. To add the right trigger you need to select edit trigger > add > show more > email console and then select the right event;
- Stop MMV01 Activation unsuccessful (=registration was aborted partway through the process > select ‘Not completed’
- Stop MMV02 Activation successful (=registration was completed successfully > select ‘Completed successfully’
- Stop MMV02 Activated using blank email (=registration was completed, but no e-mail address was entered> select ‘Completed with blank email’
For a Tour to be ready for MapMyVisit, it should have the following:
If you’re ever unsure whether you’ve added all the content you need to make a successful MapMyVisit Tour, check out the Tour Publish screen. You’ll find a summary of all the content a visitor should be able to expect from a MapMyVisit page and whether said content is there or not.

 The MapMyVisit console – the rectangular device with a touch screen and an opening for a Podcatcher – is simpler than you might expect. The process is as follows: