1. Wireless LAN (WiFi)
We recommend using a wired network connection whenever available. In cases where it isn’t, but you have a WiFi network available, you can connect the Syncbox to it using a USB WiFi dongle.
Only specific types of dongles are supported, so please contact our helpdesk if you are in need of one. Configuration must be repeated for each USB dongle. If you have more than one Syncbox, you may be provided with a WiFi access point instead, to simplify the configuration and provide the best reception.
1.1. USB WiFi dongle
Connecting the Syncbox to WiFi using a USB dongle is an easy one-time process. Follow the steps below.
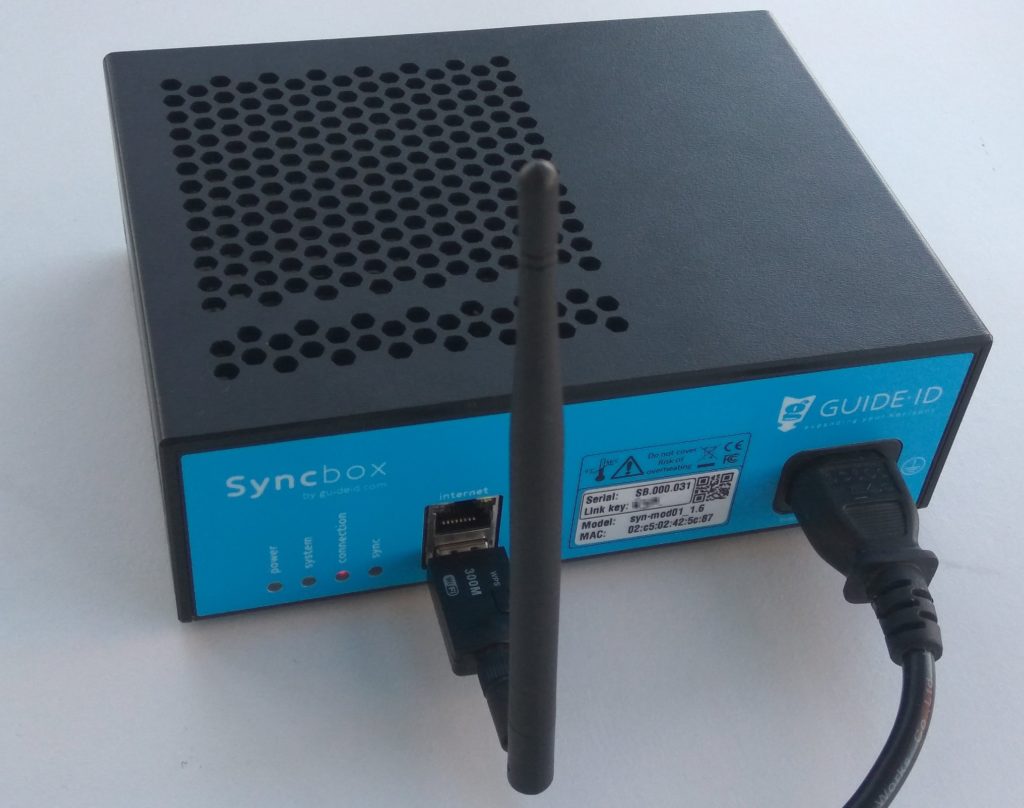
1. Insert the USB dongle into the front USB port that is below the Ethernet port, and startup you Syncbox.
Note: Do not use any of the 10 USB ports on the rear of the Syncbox for the WiFi dongle. The device will not be found.
2. Wait for about 2 minutes, until the connection LED starts flashing red. This indicates that the Syncbox has started a WiFi hotspot.
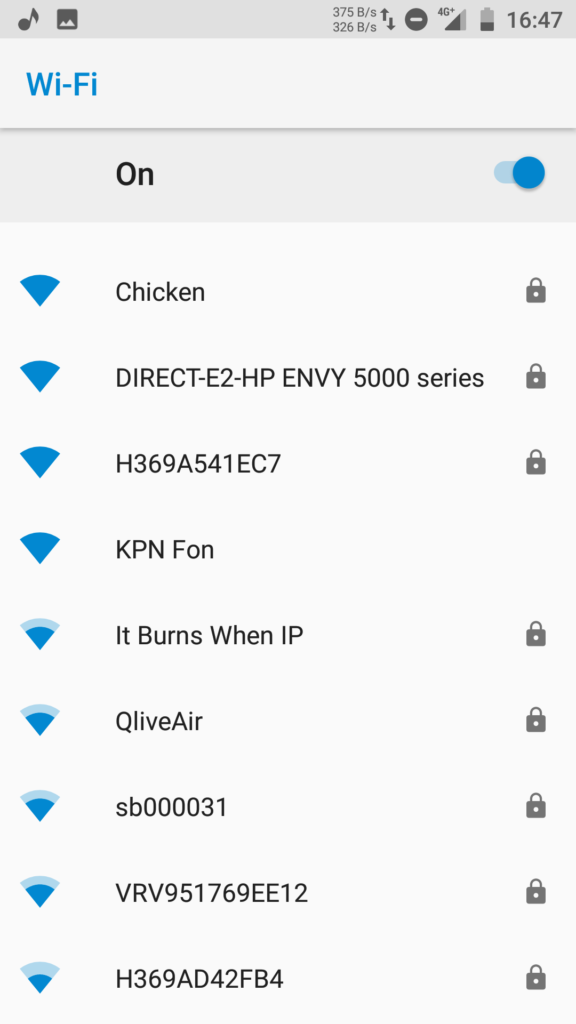
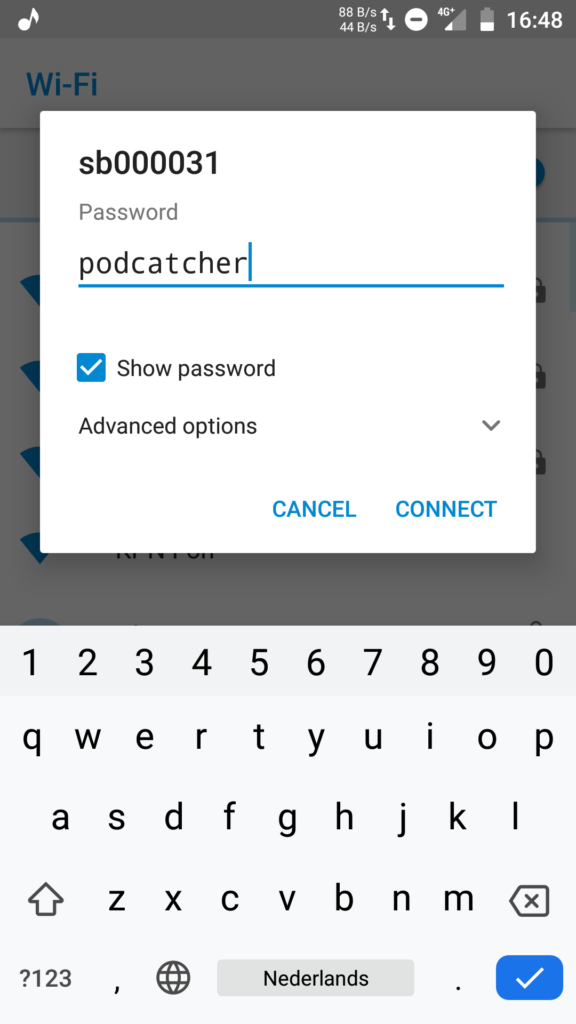
3. Search for WiFi networks on you phone (or another WiFi capable device). Select the network named after the label on you Syncbox, and connect to it. The WiFi password is “podcatcher”.
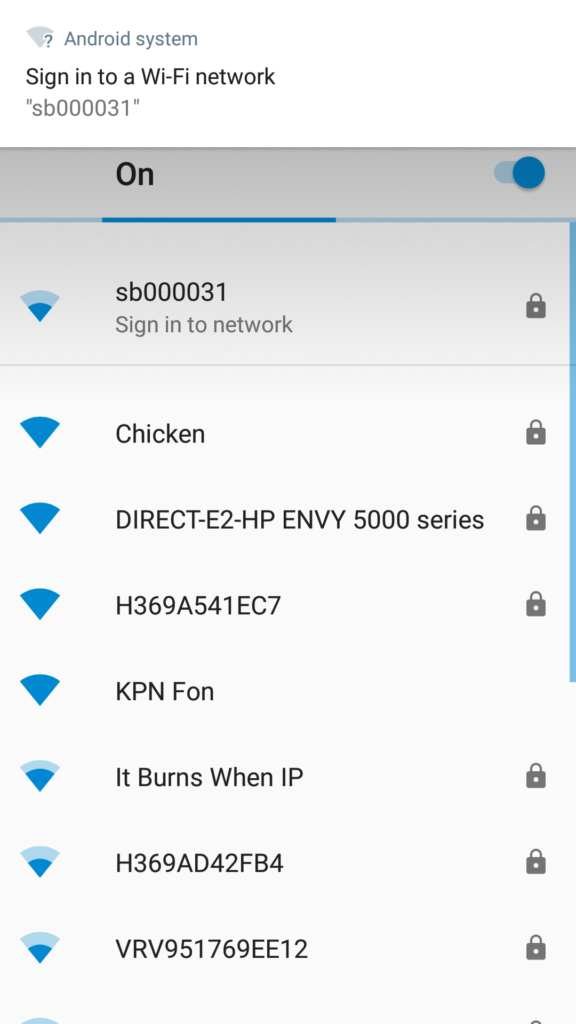
4. When you are connected to the hotspot, a popup should be shown: “Sign in to network”. Click on it to open the WiFi configuration page.
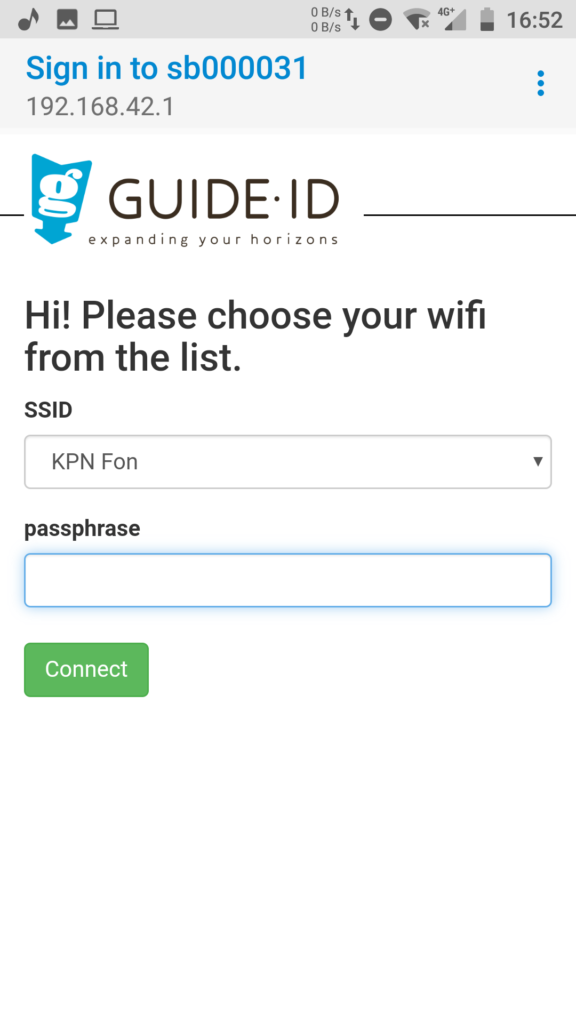
5. Select your WiFi network from the drop down list. Enter the passphrase, and click “Connect”. The WiFi hotspot will be disabled, and the Syncbox will connect to your WiFi network.
To check if the connection is succesfull, observe the connection LED. The LED should be blinking orange, and become green after about one minute. If there is an error connecting to the WiFi network, the LED will return to blinking red and the hotspot will be restarted. You can then go back to step 3.
1.2. WiFi access point
Instead of using a WiFi dongle for each Syncbox, it is possible to use an access point in client mode to connect many Syncboxes to your wireless network at once. The Syncboxes connect to the access point by means of Ethernet cables, and the access point is configured to connect to your wireless network. To help plan your setup, please contact our helpdesk.
Configuration using a WiFi access point is similar to the procedure for connecting a single USB dongle. But, you will only have to configure the access point.
2. Proxy server
On some locations it is required to access the internet through a proxy server. The Syncbox supports proxy servers through automatic and manual configuration. There are however some requirements on the type of proxy server used.
2.1. Proxy server requirements
Your proxy server must meet the following requirements:
- Support HTTPS connections to websites. Or in technical terms: support the HTTP CONNECT method, where the proxy server sets up a direct connection between the client and the website.
As most websites today use HTTPS, most proxy servers support this feature. Some proxy servers however require clients to install a special certificate, instead of using HTTP CONNECT. This is currently not supported by the Syncbox. - If your proxy server requires entering a username and password to access the internet, this is supported by the Syncbox, but currently only through the HTTP basic authentication scheme. Other existing types (e.g. HTTP Digest, HTTP NTLM and HTTP Negotiate) are currently not supported.
2.2. Automatic configuration (WPAD)
The Syncbox supports automatic configuration of a proxy server by means of the Web Proxy Auto-Discovery Protocol (WPAD). If your network is configured to support this, proxy server configuration of the Syncbox is done automatically and will work out of the box.
For more information on WPAD follow this link.
If your proxy server requires entering a username and password to access the internet, automatic configuration will normally not provide the Syncbox with these credentials. To enter them you would need to resort to manual configuration. As an alternative you can include the credentials in the the proxy URL in the PAC file. An example PAC file in this format is shown below.
function FindProxyForURL(url, host)
{
   return "PROXY username:password@192.168.1.1:8080; DIRECT";
}
Note: Including the username and password for the proxy server in the PAC file will make it available to all users on the network, unless access to the PAC file is regulated by for instance IP address. The MAC address of the Syncbox is printed on its label to allow to assigning it a specific IP address.
3. Manual configuration
Manual configuration of Syncbox network settings is possible using a USB mass storage device. Please follow the steps below.
3.1. Prepare the USB stick
- Format a USB stick in FAT format.
- Create a new text file on it named “config”. The file must not be placed within a directory.
- Add configuration entries to the file as specified below.
3.2. Network configuration entries
The configuration file “config” can contain a combination of the following configuration entries, each on a separate line.
3.2.1. General
Clear all network profiles
config_net_reset=1
Note: The reset can be combined with other entries and will be handled first.
3.2.2. Wireless LAN
WiFi ssid to apply settings to (if omitted, configure Ethernet)
config_net_wifi_ssid=My WiFi Network
WiFi password to install
config_net_wifi_pass=password
WiFi auth-alg:
– open: Open System
– shared: Shared Key
config_net_wifi_auth=open
WiFi key management:
– none: WEP
– ieee8021x: Dynamic WEP
– wpa-psk: infrastructure WPA-PSK
– sae: SAE
– wpa-eap: WPA-Enterprise
config_net_wifi_mgmt=wpa-psk
3.2.3. Proxy server
Note: Proxy configuration applies to wired Ethernet, unless it is combined with wireless LAN configuration entries. To manually configure a proxy server for WiFi, you must also manually configure the WiFi settings. If you have already used the hotspot method to configure WiFi, you must clear the existing profile using the reset option listed above.
Proxy server host
config_net_proxy_host=192.168.1.1
Proxy server port
config_net_proxy_port=8080
Proxy server username
config_net_proxy_user=username
Proxy server password
config_net_proxy_pass=password
3.3. Apply settings on a Syncbox
Using the following steps you can apply the configuration to a Syncbox. You can repeat these steps on multiple Syncboxes, using the same USB stick.
- Power off the Syncbox, by holding the “Shutdown” button 10 seconds until the system LED starts blinking orange and finally switches off.
- Insert the USB stick into the front USB port below the Ethernet connector.
Note: Do not use any of the 10 USB ports on the rear of the Syncbox for the USB stick. The device will not be found. - Press and hold the “Shutdown” button for 10 seconds to start it in recovery mode. The Syncbox should apply the settings, and automatically reboot to normal mode.
Note 1: Release the button when the system LED becomes orange. If you hold it too long it becomes red and will start in a different mode.
Note 2: If applying the settings failed or no settings were applied, the Syncbox will stay in recovery mode and the system LED will stay red. In this case check the USB device, and restart at step 1 to retry.